

Host your website on AWS with HTTPS ☁🔐

To start with, I love building applications and every aspect of it. Right from the inception where the application is still an idea or a solution to a problem or at times, a non solution to a non problem, visualising it to be a full fledged application used by everyone on the planet, to designing the solution and actually building the application, I love every bit of it! Software development, thus, is beyond profession for me, and is more of an obsession.
Since I started my career, I've had the opportunity to work with a wide range of technologies ranging from Java, Python, Springboot, Angular, React, Flutter, Scala, Docker, and AWS in domains like Telecom, Banking, and Insurance. With the ever evolving technologies in Software Development, I've also had the privilege to work on the three pillars of software architecture - Monoliths, Microservices, and Serverless.
Currently, in my role as a Tech Lead, my responsibilities spread across Solution Architecture, Backend Development, and Cloud Architecture. My go to language and framework for backend development remains to be Java and Springboot with not so occasional stints in Python. I have also been working elaborately with AWS and docker and have a pretty good hands-on experience with it. I lead a team that comprises of some of the best Backend, Frontend, and DevOps Engineers. And over the course of 15 months, we have delivered Bank Of Ireland's digital insurance platform, New Ireland's Broker application which was one of the first Serverless Applications delivered to a financial institution in Ireland, and Arachas' digital insurance platform.
I live by the motto "Learn, Build, Deploy" and thus in my free time, you would most likely see me learning something new - a coding language, a framework, an architecture pattern, a new tool for DevOps or automation or just solving a competitive programming challenge. I hope to be able to help other fellow developers or enthusiasts upskill or establish themselves in the industry through one on one help or through my blogs or workshops. In the rare occasion when I am not with my laptop, you would mostly find me in the park with my dog.
Look forward to connect with you!
So you've built your website and now you want to host it so that the world can see your work. Good call. You have two routes you can take here. First, you can host it via services like Vercel or Netlify which is the easier route to go. Or second, you can host it via AWS (Amazon Web Services), which introduces you to the world of Cloud. The former is easier or let's say, a more straightforward way of deploying your website while the latter is relatively complicated but introduces you to the world of Cloud which has its endless possibilities.
In this article, I'd be covering the AWS way only, so if this interests you, keep reading.
Overview of what we'd be doing
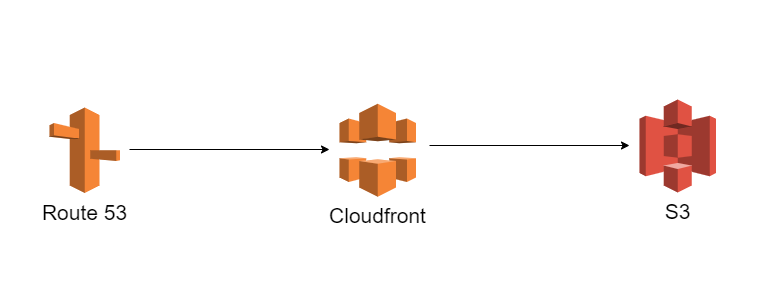
This is one of those Cloud architecture diagrams that you must have come across before but made no sense. Except, this time, it will make sense. Let's break it down and understand what these colorful icons mean and why are they relevant.
S3
On the right-hand side, the icon marked as "S3" (Simple Storage Service) is an AWS service for storing objects. Imagine it to be like a file storage system in Cloud offered by AWS. This is where your HTML, CSS, and JavaScript files will sit.
Cloudfront
In the center, the icon marked as "Cloudfront" is an AWS service that serves as the CDN i.e. Content Delivery Network. Click on that link to Wikipedia if you are unsure about what CDNs are. It's explained quite well there.
Route53
Finally, on the left, you'd see the icon marked as "Route53". This is the DNS service provided by AWS. This will help us map your domain (say, example.com) to your site. It will make more sense when see start doing it.
Let's deploy
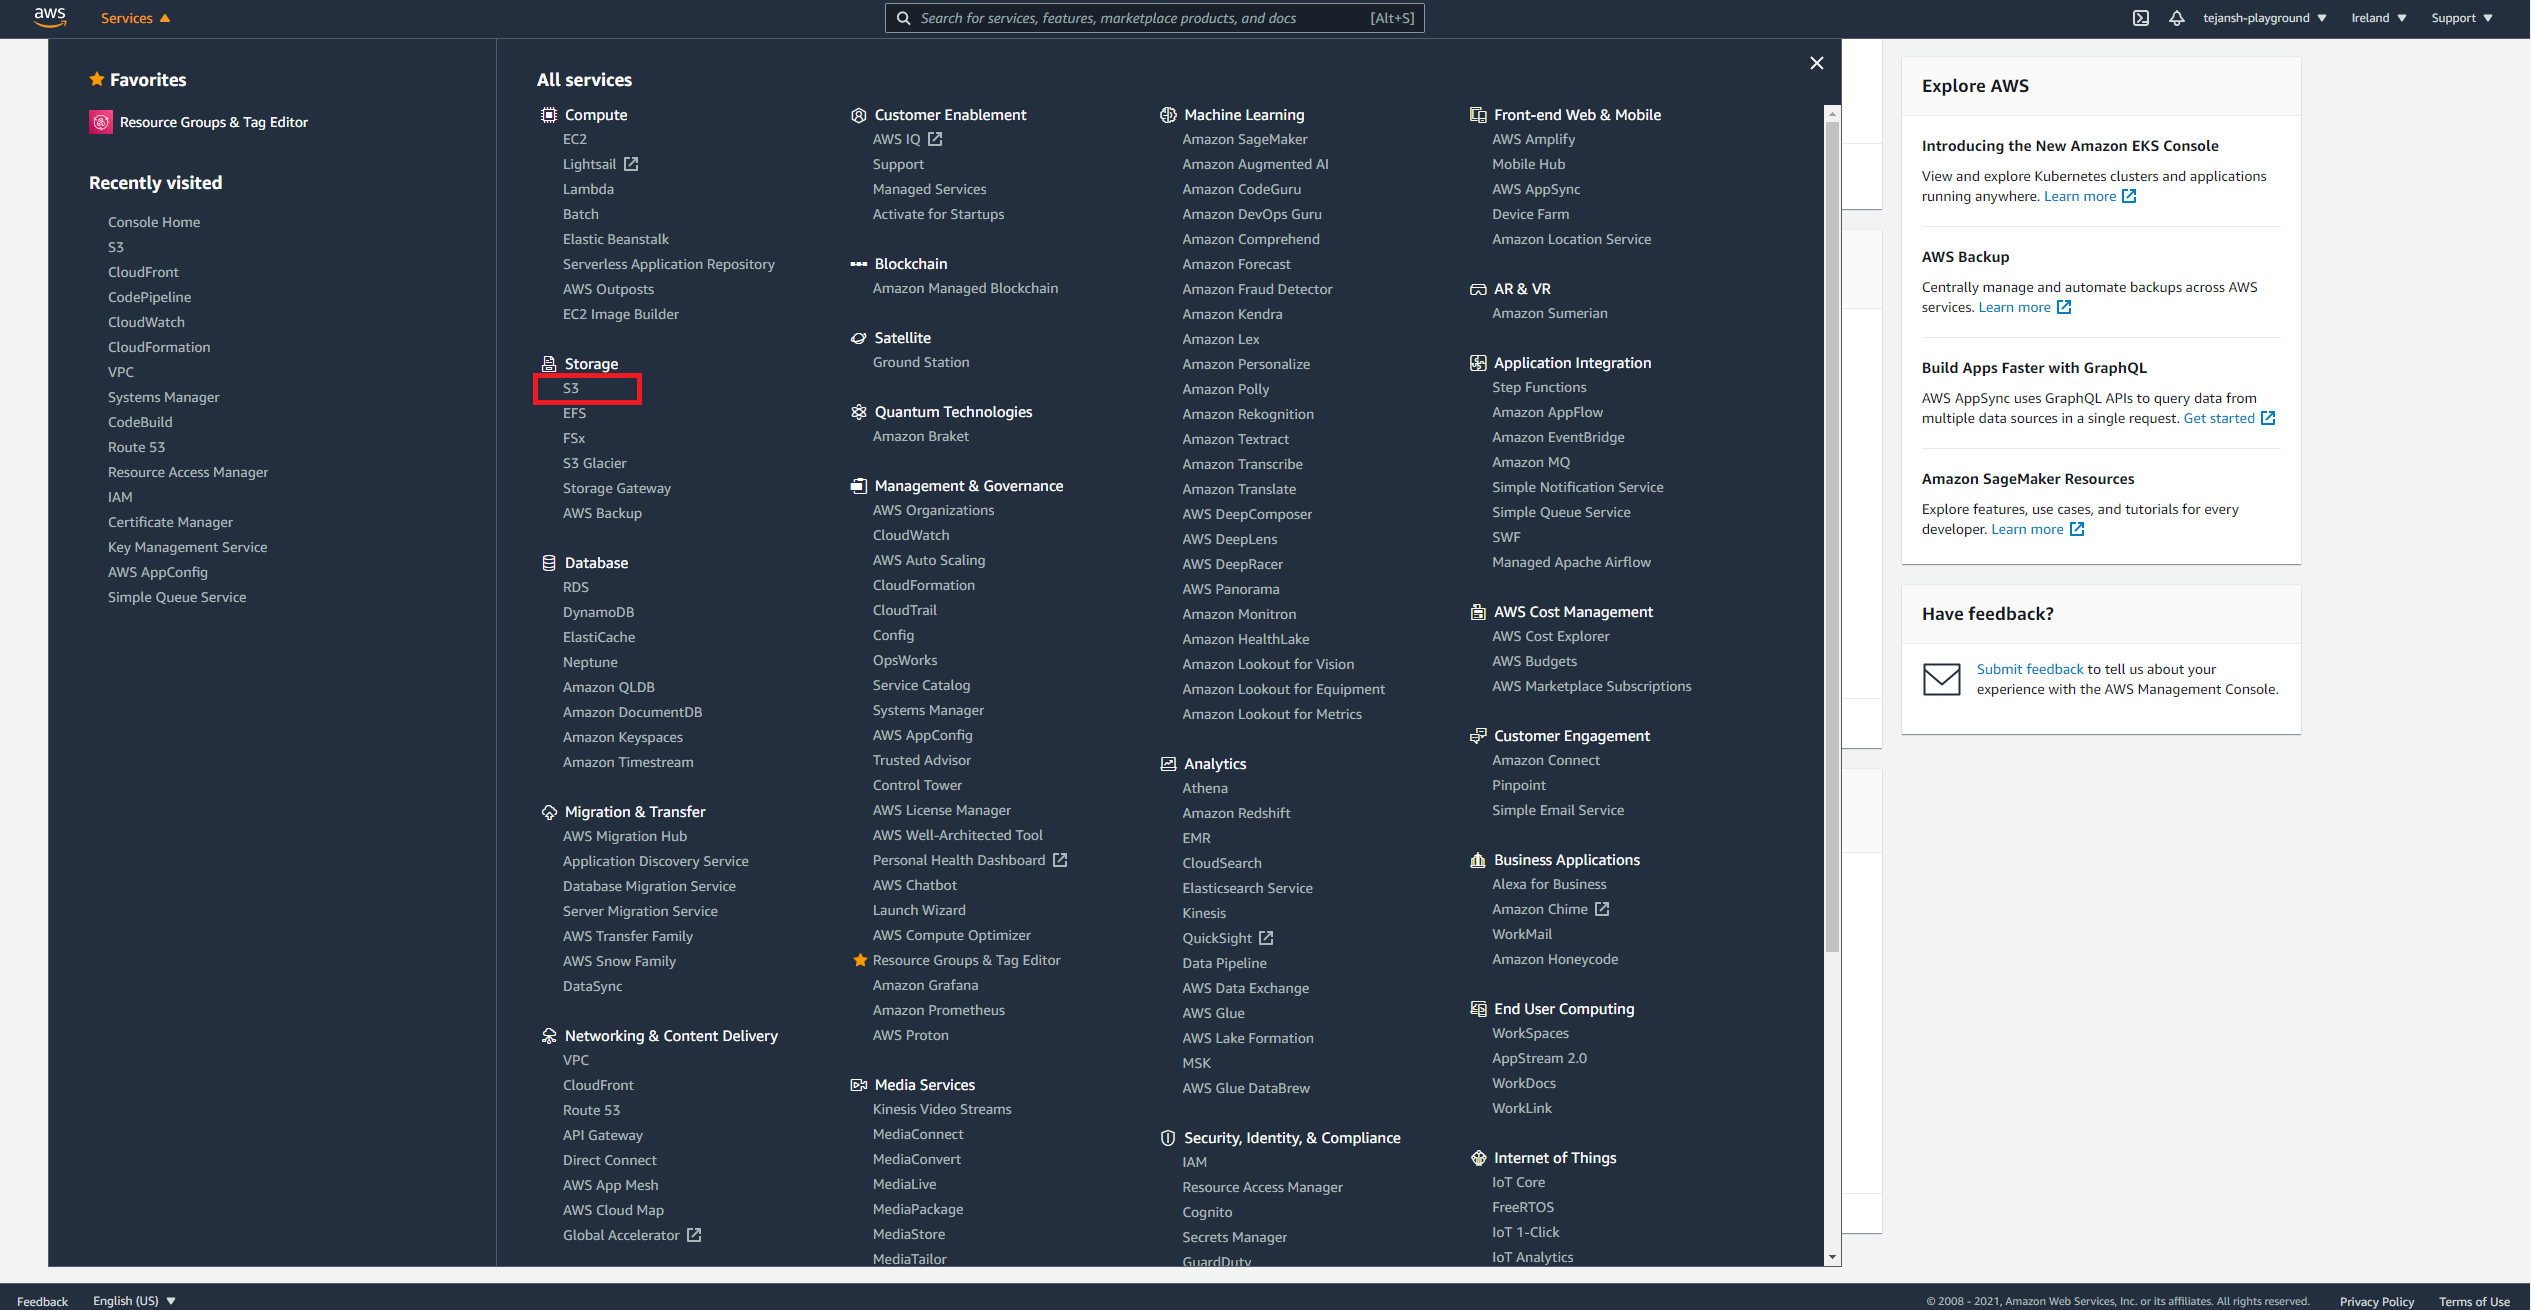
Okay, so I am assuming you have an AWS account already. If you don't you can create one here. Once you are in your console, navigate to S3. You can find that here:
Once in there, first, we need to create a bucket. Imagine bucket here to be your root directory wherein you'd be storing your files (HTML, CSS, JS, assets, etc.). When you click on the "Create Bucket" option, it'll open up a page wherein you need to add the name of your bucket and other properties. You can name your bucket whatever you'd like, as far as it is unique. The bucket name needs to be unique and has some more restrictions that are listed here. I am going to name my bucket as "my-hashnode-article". You can leave the other properties as is since we want to keep it as simple as possible. Now, click on "Create Bucket" at the end of the page:

Okay, so now we have a place to store our files. Next, go to the bucket and upload the files. When you go to your bucket, you'd see the "Upload" button. When you click on that, that'll take you to a new page wherein you can choose to add files or folders.
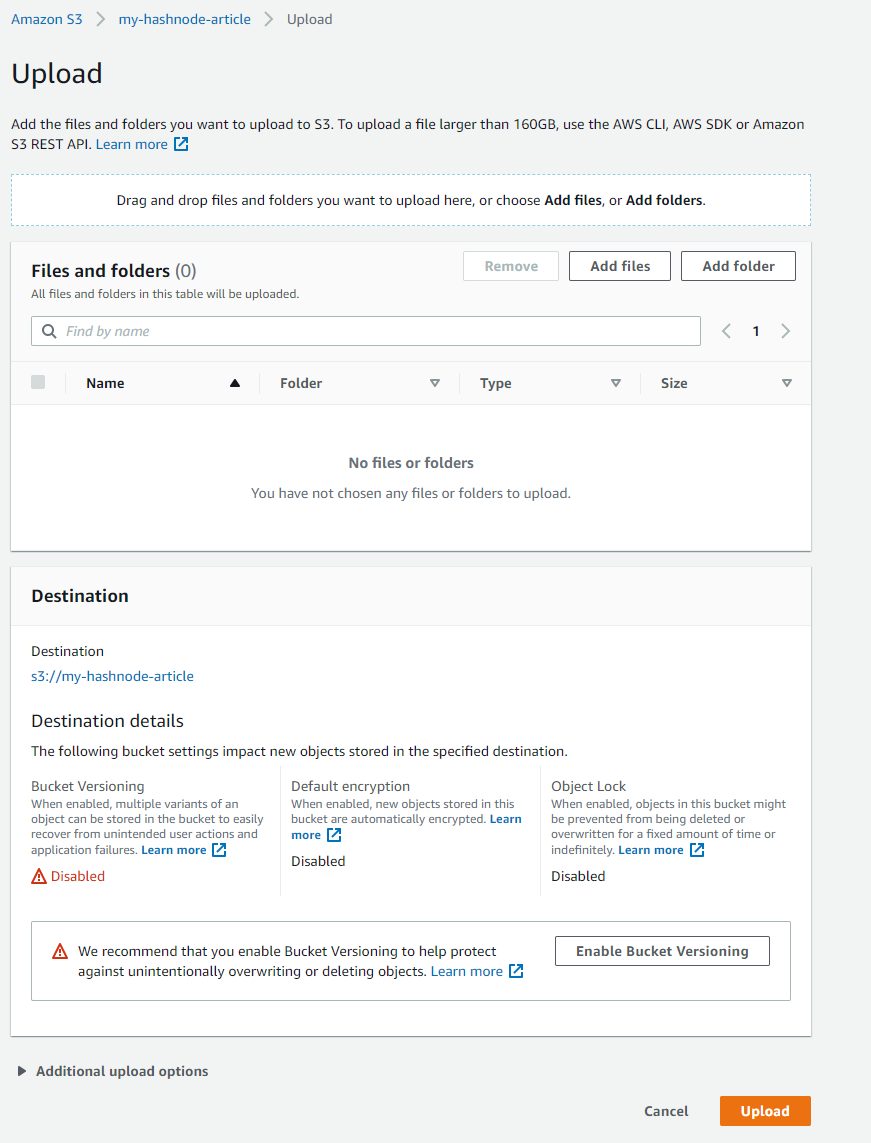
Now, you can add your files and folders and that's all we need to do with S3.
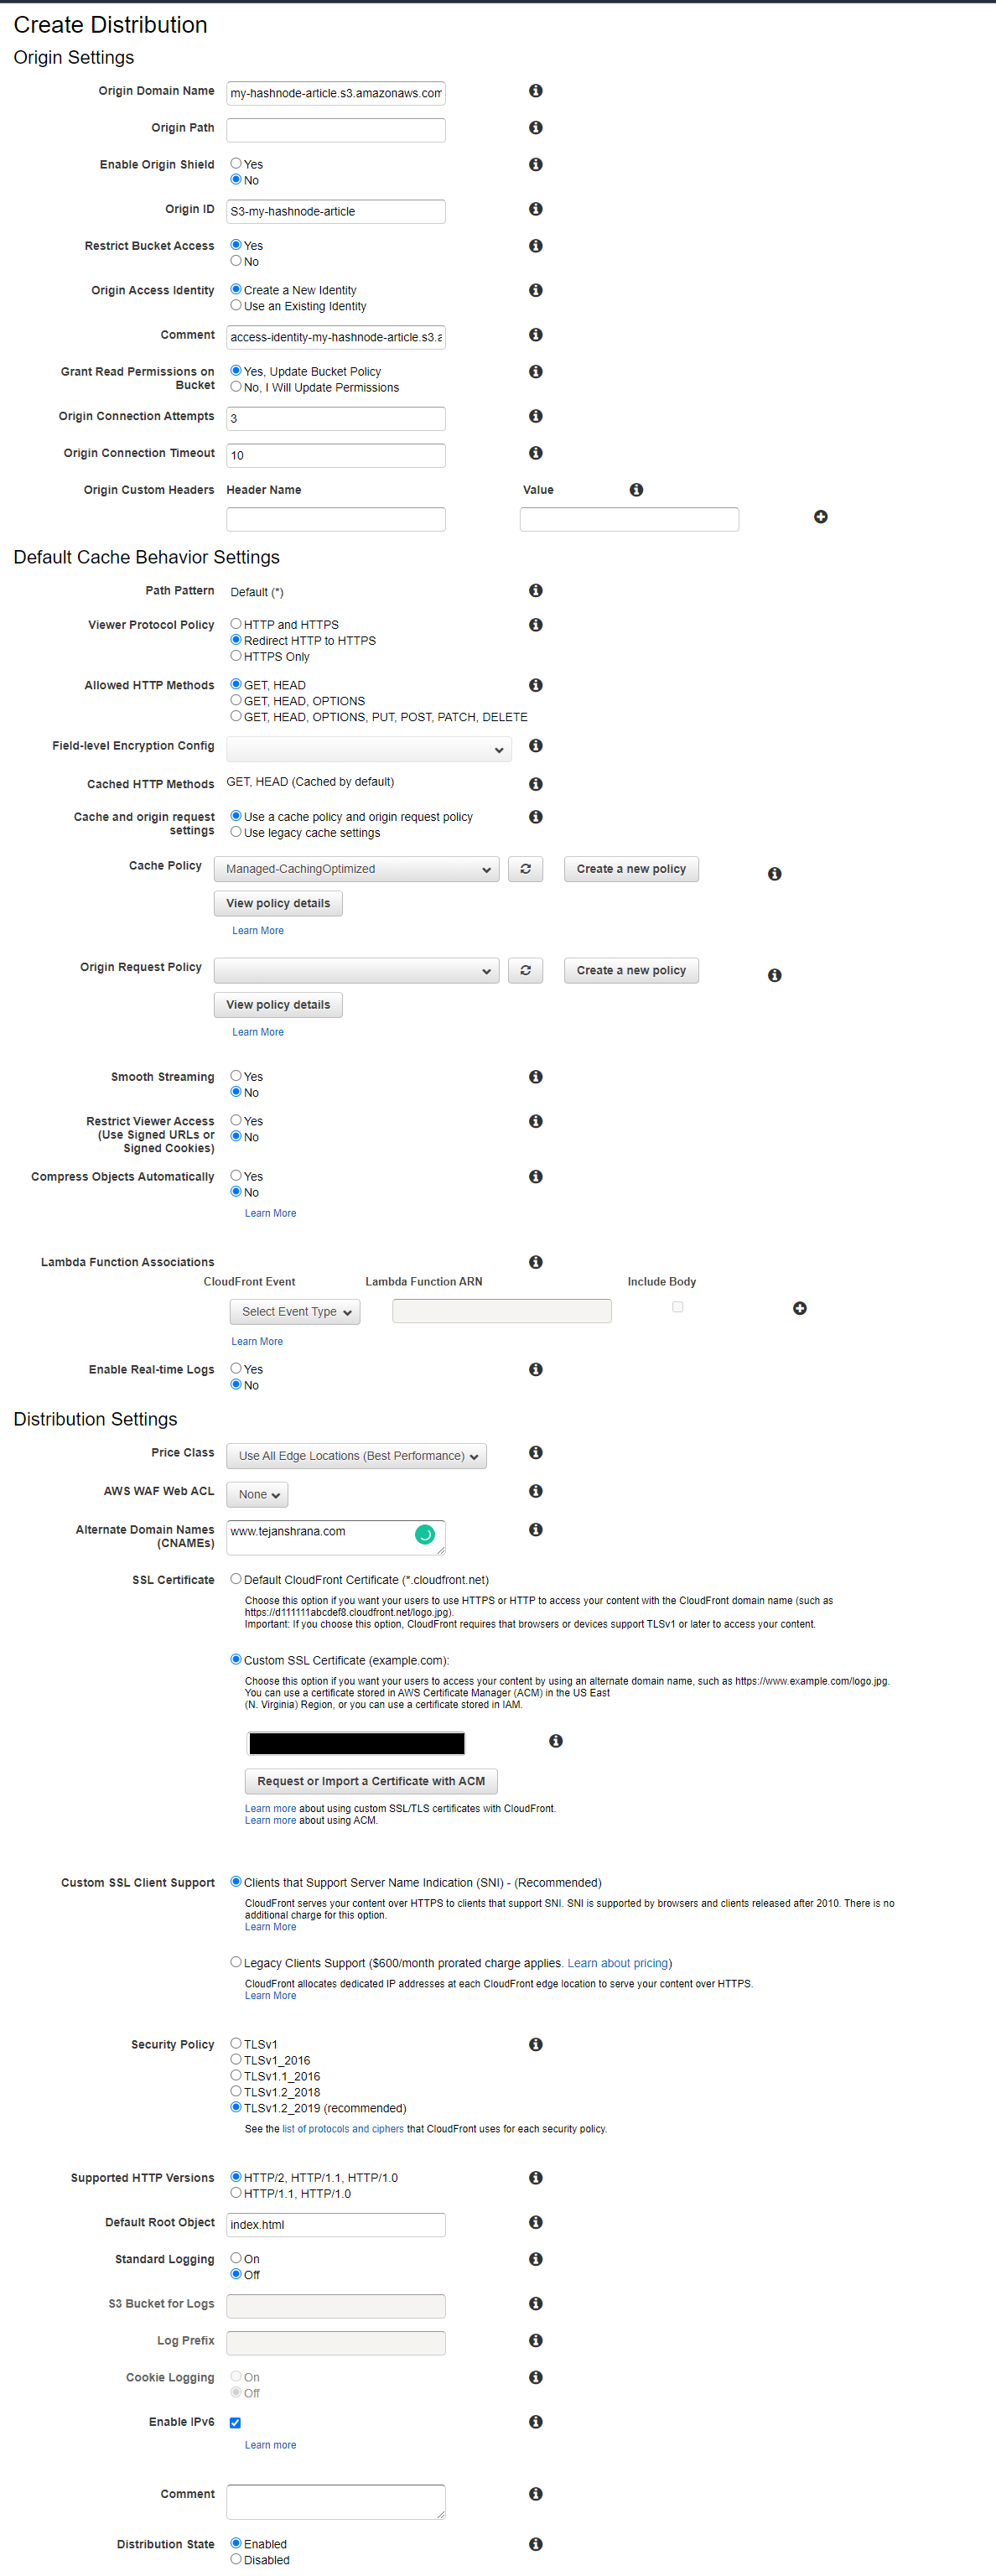
Let's move on to Cloudfront now. Like you chose the S3 service from the AWS console, you can choose CloudFront and you should see the landing with the option to create a distribution. Upon clicking, you'd see a huge form you're expected to fill. Don't worry, we are going to skip a lot of those fields and leave them to the default values. Let's start filling in the form:
- Origin domain name: Choose the S3 bucket where you've uploaded your files.
- Origin path: If your files are under a directory in your S3 bucket, add that path here, else if it is at the root level, leave it empty. I have mine directly under the bucket so I will leave it empty.
- Restrict Bucket Access: Yes
- Origin Access Identity: Create a New Identity
- Grant Read Permissions on Bucket: Yes, Update Bucket Policy
- Viewer Protocol Policy: This option is under the Default Cache Behavior Settings. Choose the "Redirect HTTP to HTTPS" option so we can enforce users to be calling your website at HTTPS. If they call your website at HTTP, they'd be automatically redirected to HTTPS.
- Alternate Domain Names (CNAMEs): This option is under the Distribution Settings. Here, if you have a domain that you are building this website for, you can add that here. I am going to add "www[dot]tejanshrana[dot]com" since that is my domain. If you don't have a domain but would like to buy one, you can refer to the docs here and in this article, I will also cover the few extra steps you need to take to ensure that your domain is reachable when you've bought a domain from a vendor other than AWS.
- SSL Certificate: If you are not adding a custom domain name, you can leave this option defaulted to "Default CloudFront Certificate (*.cloudfront.net)". If you've entered the CNAME, you need to import the SSL certificate. This is required to enable HTTPS on your website. You can do this by clicking the "Request or Import Certificate with ACM" button. This will open a new window from the AWS Certificate Manager service where you're expected to verify that the domain belongs to you. To do this, enter the domain name in the text box and click next. On the next page, you have the option to either verify by DNS validation or by Email validation. Since email is a more straightforward way to validate, let's go with that. Select Email Validation and click next. On the next page, you have the option to add tags. This is an optional step and I am going to skip it. Finally, click on the review button and review the information you've inputted. If everything looks alright. Click on the confirm and request button. You would now receive an email on the email address you'd used to purchase the domain with a link to confirm that it's your domain. Click on that link and you're done! Now, the SSL certificate is imported into your AWS account.
- Default Root Object: Here, enter the entry point for your website. For instance, my website's entry point is "index.html" so that's what I am going to enter here.
- Your completed form should look similar to:
Now, click on Create Distribution when you're done and you'd need to wait a couple of minutes before the distribution is ready. Go get a cup of coffee and reload the page 500 times hoping that the status would change, like the rest of us. When ready you'd see the status change to "Deployed" from "In progress".
Great, we now have a website for the world to see. However, this website is not yet reachable via your domain name. This needs a few more steps. If you don't have a domain and have chosen to use the default Cloudfront domain, you can see your domain on the Cloudfront landing page:

Now, let's configure the DNS to let your website be reachable via your domain name. For this, go to the Route53 AWS service from the AWS console. Upon landing, you'd see an option DNS management called "Create Hosted Zone"; click on that enter the domain name on the next page. Add it without the "www" so that you can use it with different subdomains in the future if need be. You can leave the other options to the default value and click on Create hosted zone. This will create a zone for you that'd be publicly accessible i.e. your domain would be reachable by everyone using the internet.
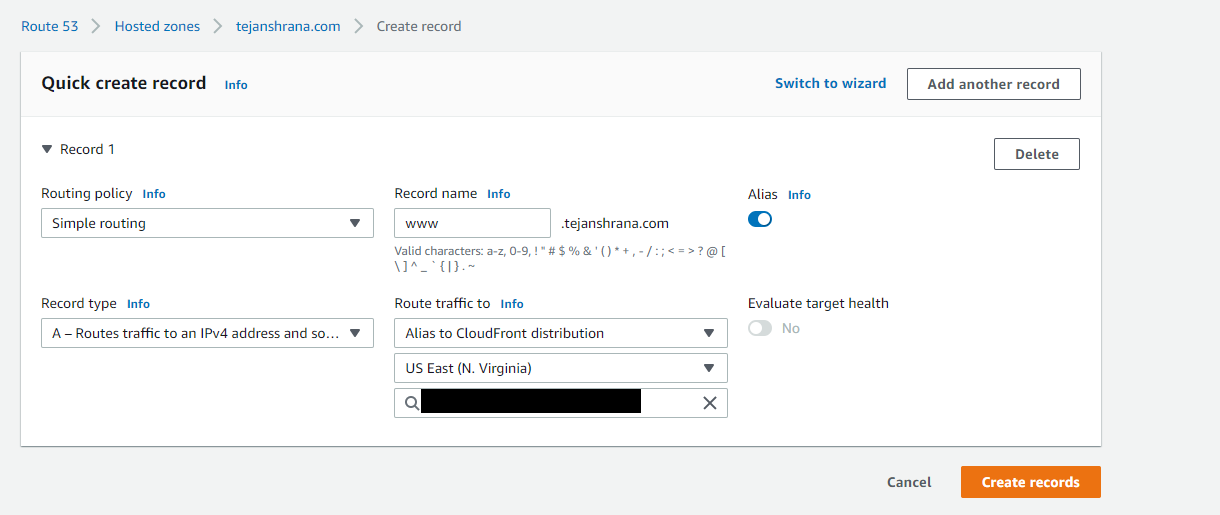
Next, click on the hosted zone you've just created, and on the next page, click on "Create Record". On the next page, under Record Name, enter the subdomain by which you want your website to be reached. If you are creating a website for "www[dot]tejanshrana[dot]com", you can enter "www" in the record name. However, if you're creating a website for "tejanshrana.com", you can leave this empty. Now, toggle on the "Alias" option, and for the Record Type option, select "A - Traffic route to an IPV4 address and some AWS resources". In the dropdown next to it with the option "Route traffic to", choose "Alias to CloudFront distribution" and then choose your distribution name below it. In the end, your form should look similar to:
Now, we need to create another record for the AAAA routes to ensure that your website is available to IPV4 as well as IPV6 traffic. Repeat the same steps again but for the Record Type option, select "AAAA - Traffic route to an IPV6 address and some AWS resources".
Okay, we are almost there now. If you've bought your domain from GoDaddy, you'd need to login to your GoDaddy account and change the Named Servers there. You can do this in a few simple steps as follows:
- Log in to your GoDaddy account.
- Select your domain to access the Domain Settings page.
- Under Additional Settings, select Manage DNS.
- In the Nameservers section, select Change.
- Now, you'd see text boxes to add domains. You can find these values in your AWS Route53 hosted zone dashboard where the type is mentioned as "NS". Look at the below image for reference:
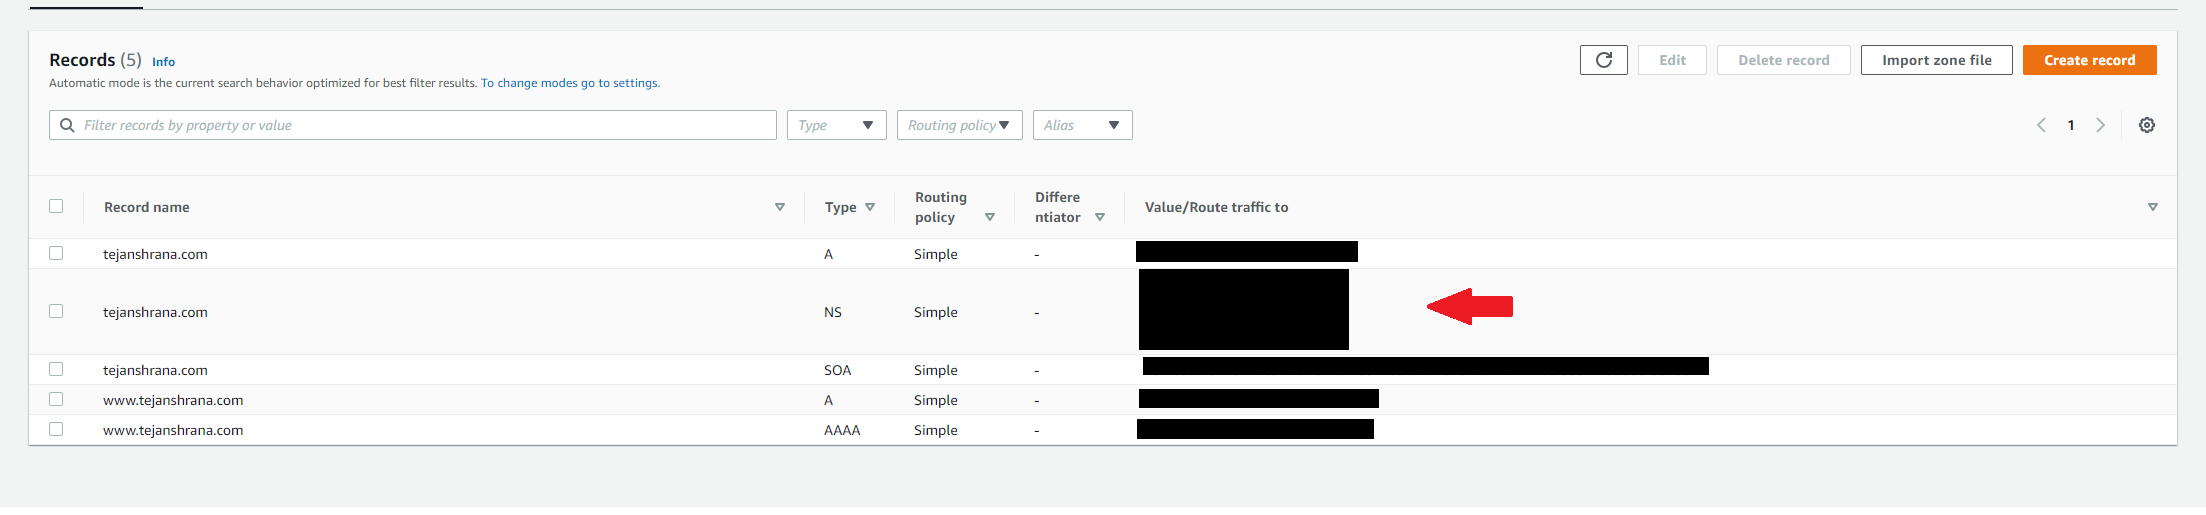
Enter all 4 values in this section and save the settings. This takes quite some time to reflect (May take upto 48 hours). You can see the status here by entering your domain name and all or most of the regions should have a green tick (✔) next to it.
We are LIVE!
BONUS
Okay, so say your website is reachable at www[dot]tejanshrana[dot]com but your user enters tejanshrana.com and sees nothing, but you want them to be redirected to www[dot]tejanshrana[dot]com. We can fix that too! Let's do that now.
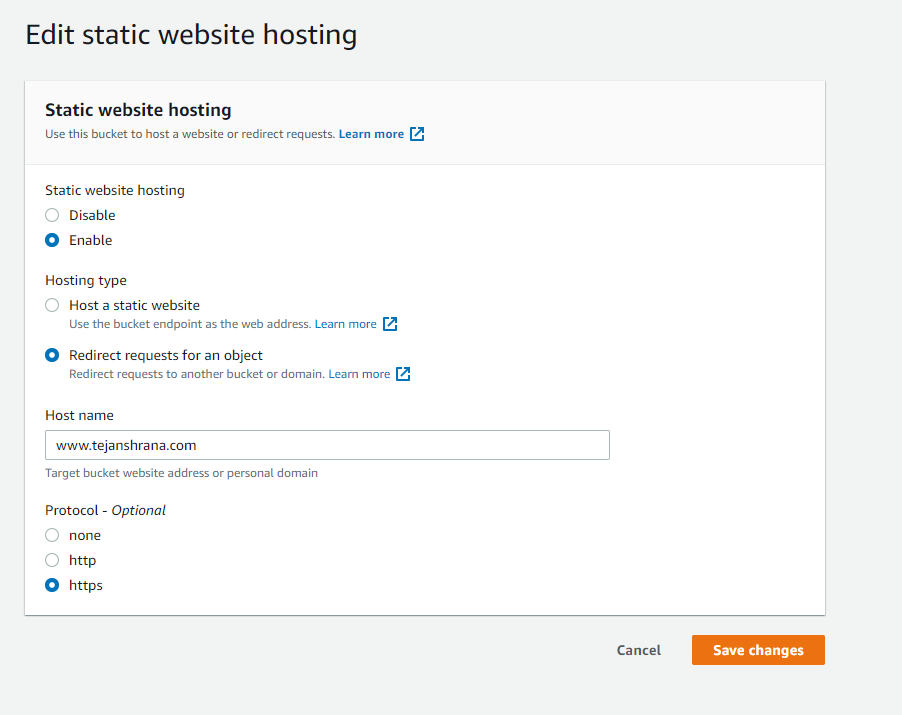
Create an S3 bucket like the way you'd originally created for hosting your website. Once created, we don't want to upload anything here since we will be using this to redirect to your original website. Now, go to your bucket and click on Properties. Under properties, go to the last option that says "Static website hosting". Click on Edit and on the next page, you'd again see a few options. Fill them as below:
- Static website hosting: Enable
- Hosting type: Redirect requests for an object
- Host name: Enter your website's address here.
- Protocol: https.
Finally, the form should look similar to:
Once you're done, go back to the properties page of this S3 bucket and to the "Static website hosting" options again. Now, you'd see "Bucket website endpoint" there. Copy this since we are going to use this to create the Cloudfront distribution.
Now, let's go to Cloudfront and create a distribution for this bucket. Don't worry, we have fewer options to fill in this time. You can do it as follows:
- Origin Domain Name: Paste the URL you'd copied from the S3 bucket.
- Viewer Protocol Policy: Redirect HTTP to HTTPS
- SSL Certificate: Custom SSL Certificate (example.com). Select the certificate you'd imported while creating the Cloudfront distribution the first time.
That's it. Create the distribution and wait for it to be deployed.
Next, go to Route53 and select the hosted zone you'd created previously and create a new record. Now, in the alias, if you are trying to redirect say tejanshrana.com to www[dot]tejanshrana[dot]com, leave it empty, if you are doing it otherwise i.e. www[dot]tejanshrana[dot]com to tejanshrana.com, enter the alias as "www". Follow the same steps as previously and choose the Cloudfront distribution you've created last.
AND WE ARE DONE! Show the world your new shiny website! In the next blog, I'll cover how to build a completely Serverless application via AWS. So keep an eye if that interests you. 😎


