

Access MacOS from your Windows machine 💻

To start with, I love building applications and every aspect of it. Right from the inception where the application is still an idea or a solution to a problem or at times, a non solution to a non problem, visualising it to be a full fledged application used by everyone on the planet, to designing the solution and actually building the application, I love every bit of it! Software development, thus, is beyond profession for me, and is more of an obsession.
Since I started my career, I've had the opportunity to work with a wide range of technologies ranging from Java, Python, Springboot, Angular, React, Flutter, Scala, Docker, and AWS in domains like Telecom, Banking, and Insurance. With the ever evolving technologies in Software Development, I've also had the privilege to work on the three pillars of software architecture - Monoliths, Microservices, and Serverless.
Currently, in my role as a Tech Lead, my responsibilities spread across Solution Architecture, Backend Development, and Cloud Architecture. My go to language and framework for backend development remains to be Java and Springboot with not so occasional stints in Python. I have also been working elaborately with AWS and docker and have a pretty good hands-on experience with it. I lead a team that comprises of some of the best Backend, Frontend, and DevOps Engineers. And over the course of 15 months, we have delivered Bank Of Ireland's digital insurance platform, New Ireland's Broker application which was one of the first Serverless Applications delivered to a financial institution in Ireland, and Arachas' digital insurance platform.
I live by the motto "Learn, Build, Deploy" and thus in my free time, you would most likely see me learning something new - a coding language, a framework, an architecture pattern, a new tool for DevOps or automation or just solving a competitive programming challenge. I hope to be able to help other fellow developers or enthusiasts upskill or establish themselves in the industry through one on one help or through my blogs or workshops. In the rare occasion when I am not with my laptop, you would mostly find me in the park with my dog.
Look forward to connect with you!
MacOS is pretty cool and in some cases a necessity. For instance, if you want to publish an iOS app, you need macOS. However, it is Apple's proprietary OS and thus shipped with their super-expensive hardware. This makes it difficult for a lot of us to really play around and build iOS apps.
In today's Cloud era, it would be a shame if we still need to spend money on expensive hardware for a specific workflow. That's exactly what AWS thought too (and built a whole business around it but that's a topic for some other day). Towards the end of 2020, AWS announced that they are launching EC2 instances with macOS. This means, you no longer need to own an Apple machine to use macOS. You can spin up an EC2 instance with macOS and use it from your non-Apple machine 🔥
In this article, we will see how can we launch a macOS EC2 instance and access it from our machine.
IMPORTANT: Mac EC2 is not eligible under the free tier and you will be charged if you launch one. If you are unsure about paying a bill for accessing this EC2, just read along for now and maybe bookmark this article and you can come back to it when you really need to use a macOS and don't mind paying a bill for it.
What do you need?
- An AWS account. If you don't have one, you can create it here.
- A windows machine.
- PuTTY. We will be using this for accessing (via SSH) the macOS command line.
- PuTTYgen. We will be using this to convert a
.pemfile to.ppkfile. - VNC Viewer. We will be using this to access macOS GUI.
I would suggest downloading and installing PuTTY, PuTTYgen (no installation needed) and VNC Viewer before proceeding 🙂
Let's launch that macOS machine
First, let's launch the macOS EC2 machine, and then we can go over how can we access it. To launch, let's first go to our AWS account and go to the EC2 service. The landing page should look like the image below:
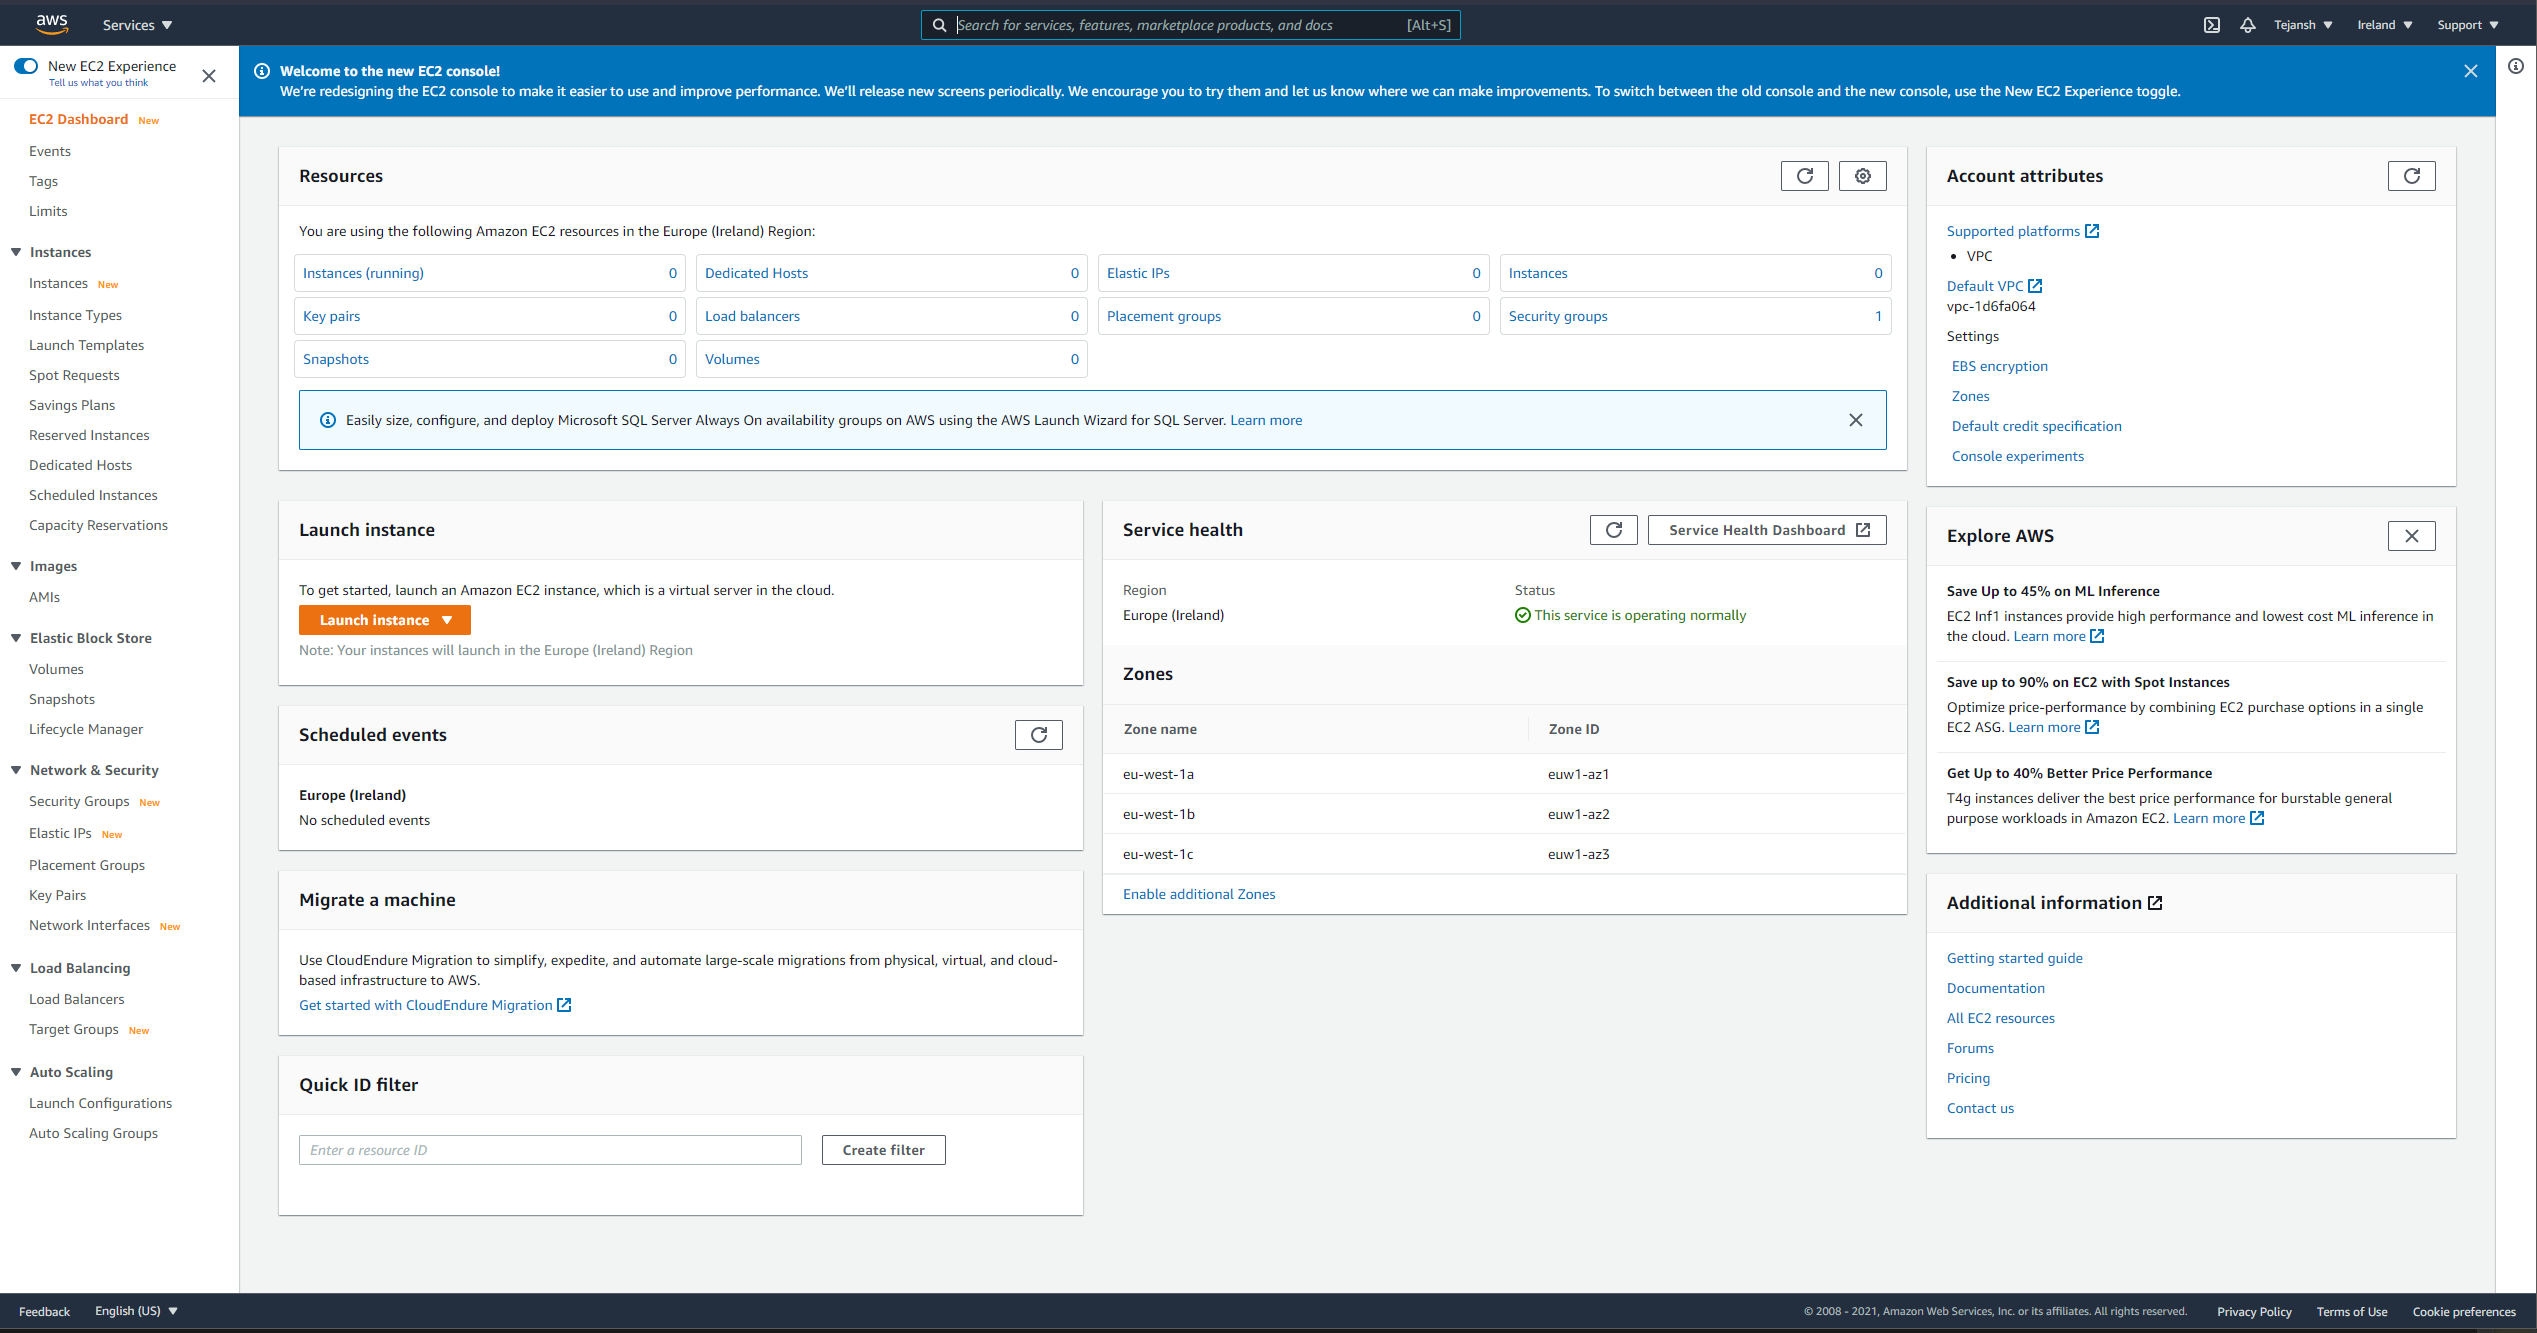
Next, click on Launch Instance (the orange button from the screenshot above). This will open a page where you are asked to choose an Amazon Machine Image (AMI). AMIs are basically a set of software configurations that we want installed in our EC2 machine. Here, we want our EC2 to be installed with a macOS. There are various versions of macOS offered by AWS for our EC2. Let's choose Big Sur which is the latest version of macOS at the time of writing this article.
On the next page, you will be asked to choose an instance size. However, we don't really have a choice here at this point in time since there is only one type available - mac1.metal which is a pretty powerful machine. Next, click on the Next: Configure Instance Details button and that should open a form wherein we need to fill in the instance details. Don't worry, we can leave a lot of it to the default values. If you scroll down, you should see the Host option with a hyperlink called Allocate a new host. Click on that link and it should open a new page where we will be configuring a dedicated host for this EC2 instance. You can read more about dedicated hosts here. A key thing to note here is that a dedicated host for Mac cannot be launched for less than 24 hours. What does this mean? Even if you turn on a Mac EC2 for testing and shut it down in a minute, you will be charged for 24 hours 😢
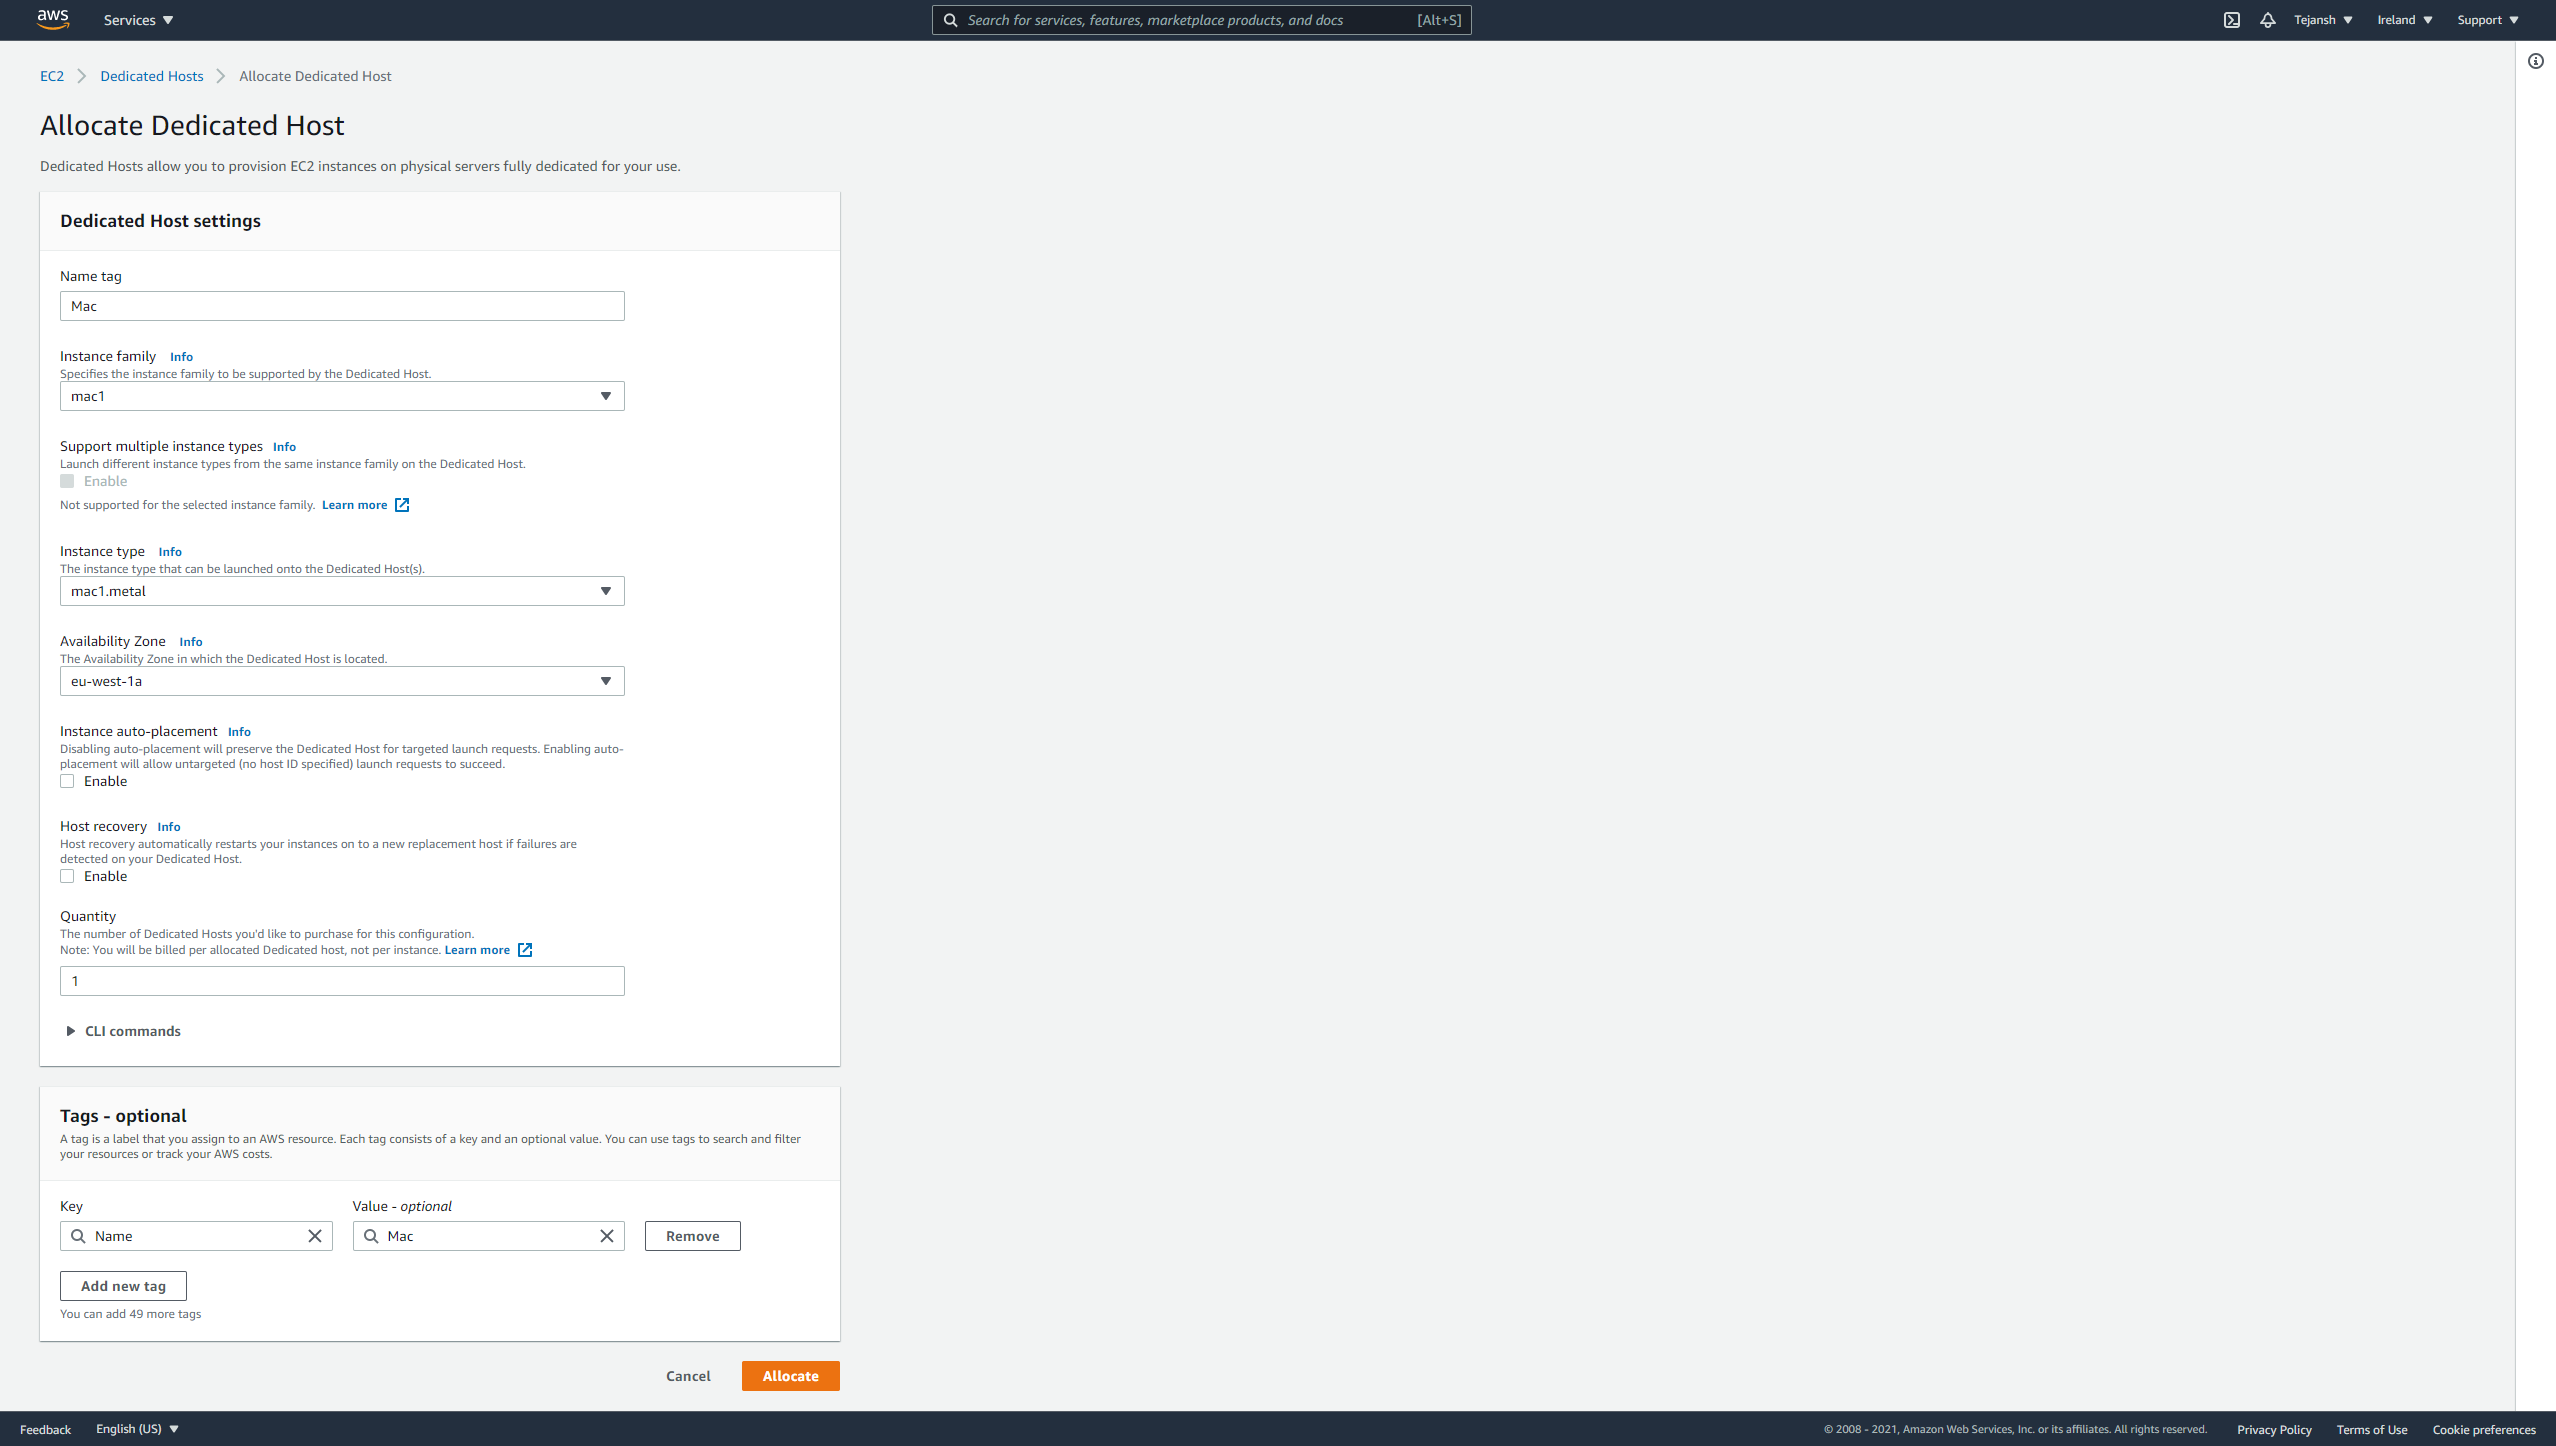
Alright, in the dedicated hosts' section, fill in a name of your choice. I am calling it Mac. Under instance family, choose mac1 (if you don't see this option, EC2 Mac is most likely not available in your region yet), under instance type, choose mac1.metal, and under availability zone, you can choose any zone of your choice. I am choosing eu-west-1a. On completion, your form should look like this:
Great, now click on the Allocate button to finish this process. Now, if you see the below error :
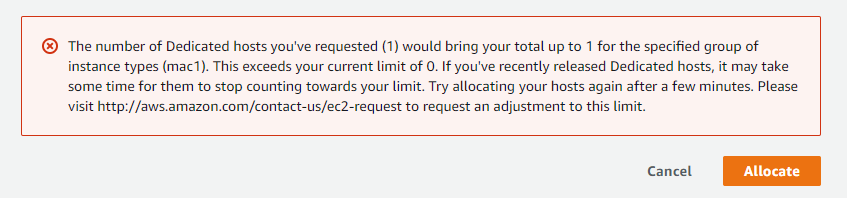
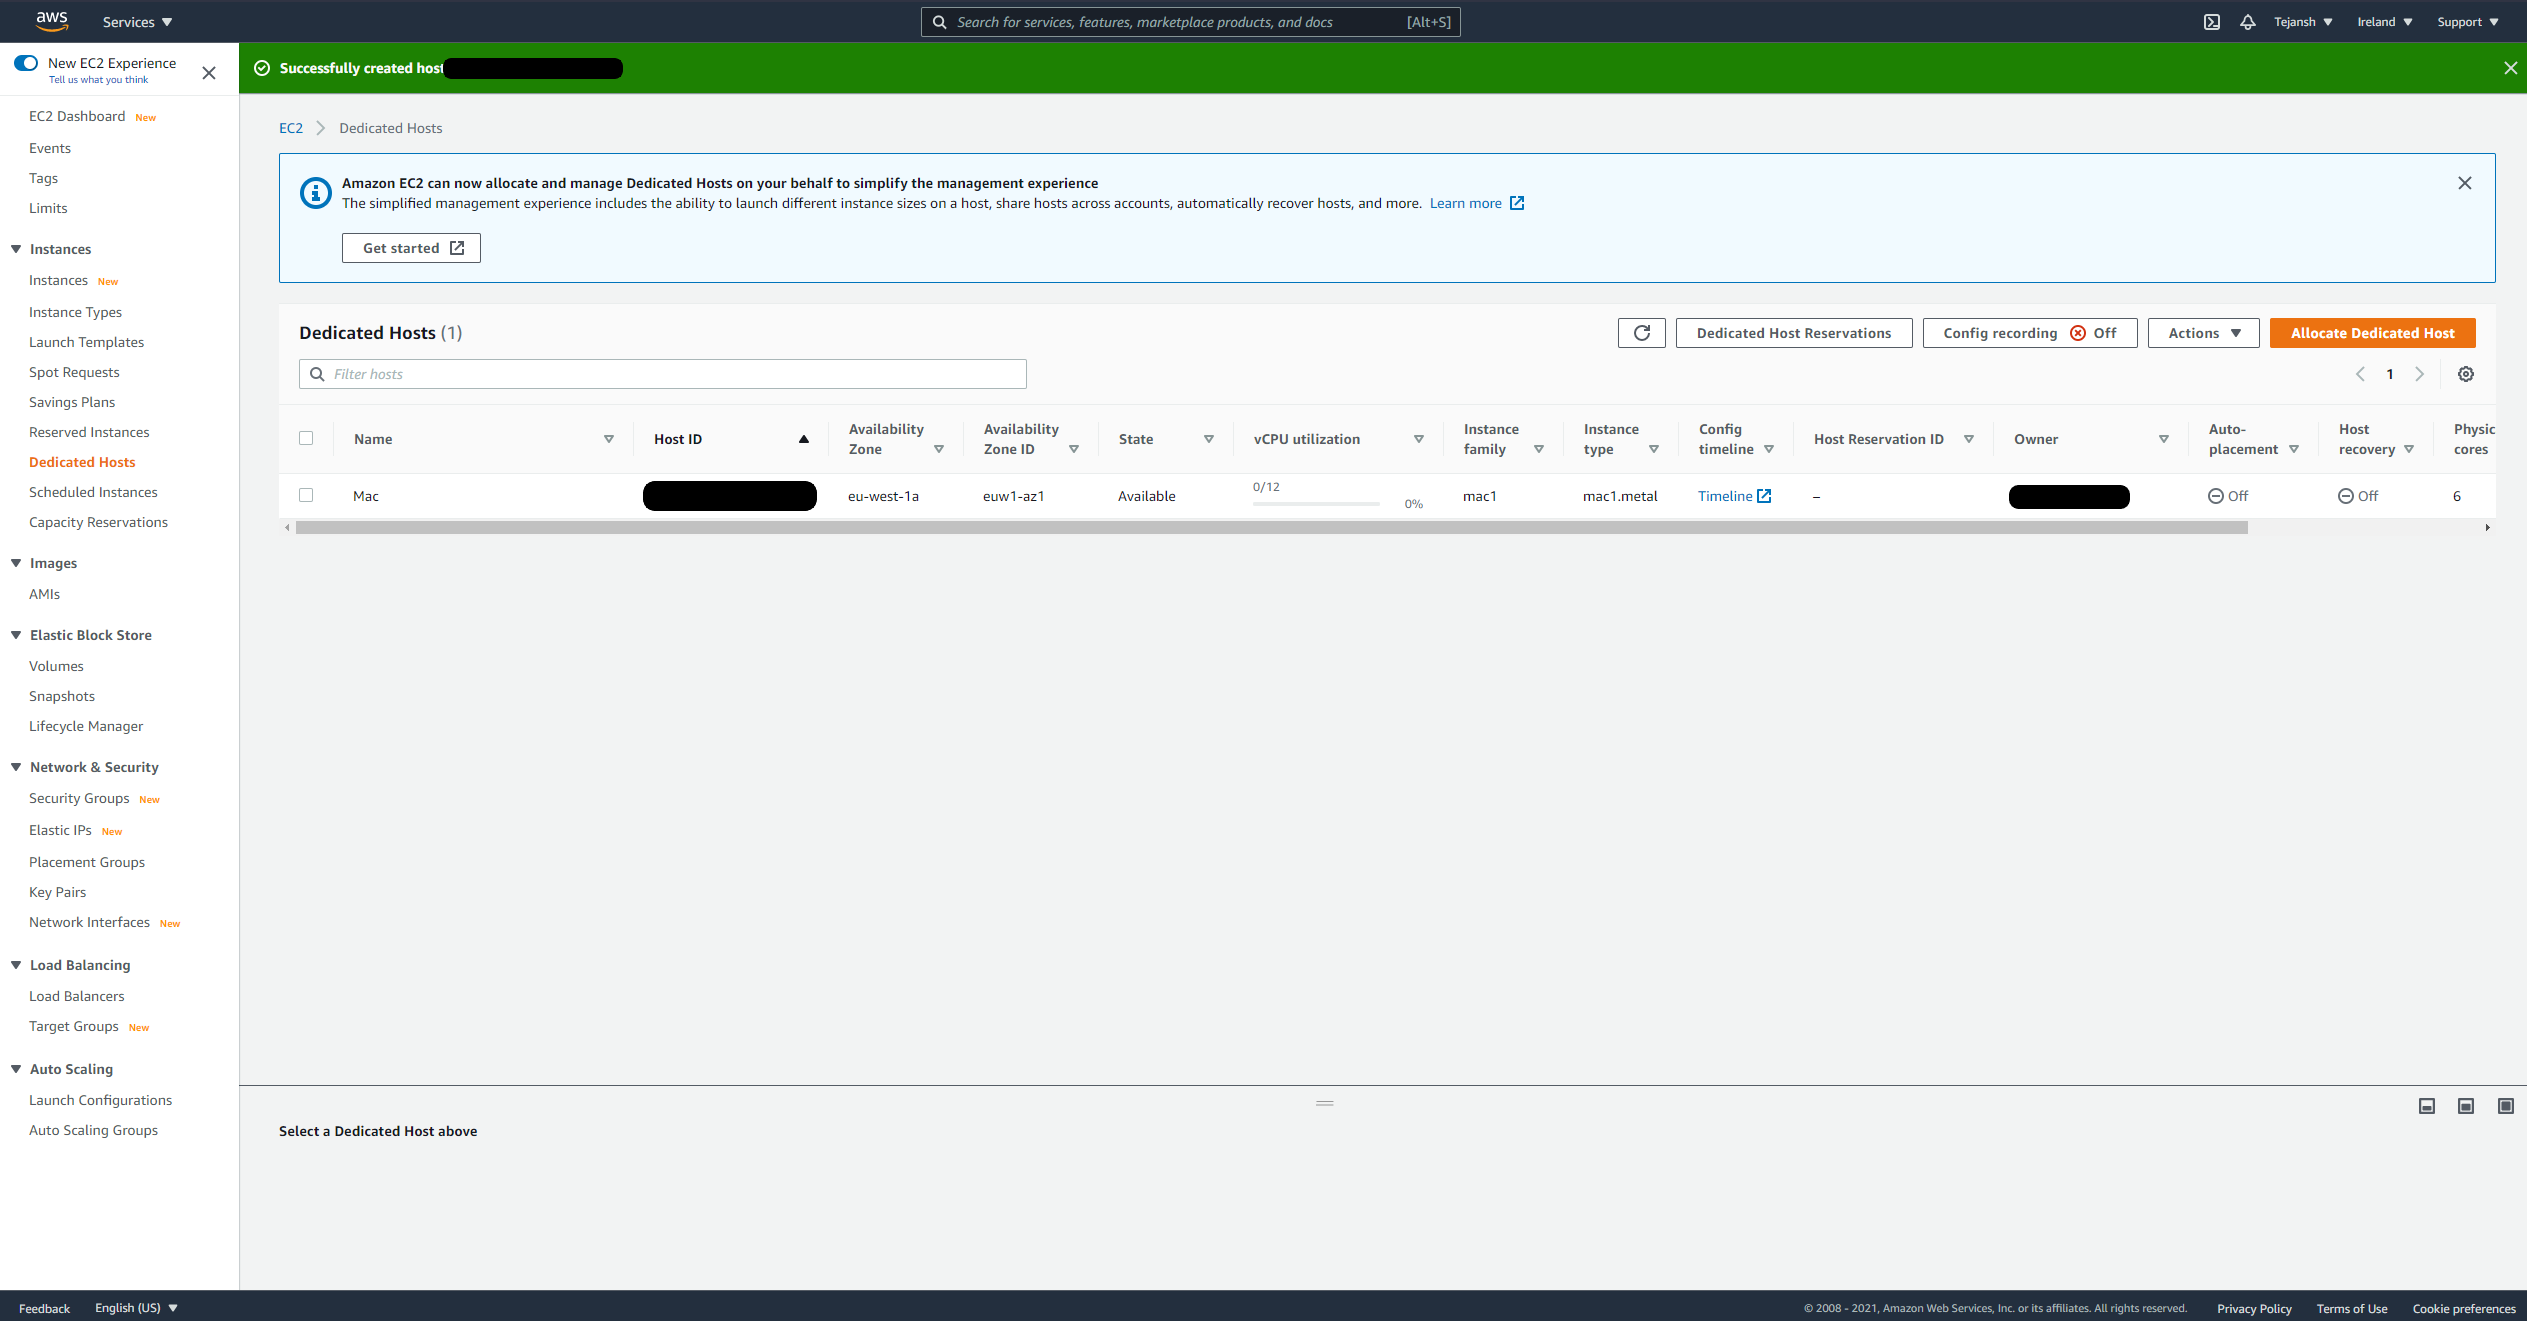
This means that you are not allocated a quota to run these instances. To fix this, head over to the link mentioned in that error message and raise a request to increase the quota. Note that you need to change the Limit Type to EC2 Dedicated Hosts for this request. This can take up to 2-3 days to be allocated and they may ask you additional questions regarding the use case. Nothing too complicated and you can let them know you are willing to try out the Mac EC2 for development. This is a standard protocol and usually pretty smooth. Once done, you will get an email from AWS confirming that the limit has been increased. Awesome, now you are ready to try and allocate a dedicated host again. This time it should work and you should see the below page:
Now, we are all set to launch our Mac EC2 😎
Let's go back to the EC2 configuration and select this dedicated host we just created as the Host. Note that if it does not show up, you might need to click on the refresh icon next to the host dropdown.
Great, now click on Next: Add Storage. Since we don't necessarily need additional storage, we will just click on Next: Add Tags. I am not allocating any tags. You can add tags if you wish to but it's not a mandatory step. Now click on Next: Configure Security Group.
On this page, you will see a table with the first column named Type. Under that, there is a dropdown. From this dropdown select SSH and for Source, select My IP. Next, click on Add Rule and that should create another similar row. This time, under Type select Custom TCP Rule, under Port range, add 5900, and under source you can add My IP again. Here, the first port i.e. port 22 will be used by us to SSH to the Mac EC2 whereas port 5900 will be used by us to access the GUI.
Now click on Review and Launch. Now you should see the below page:
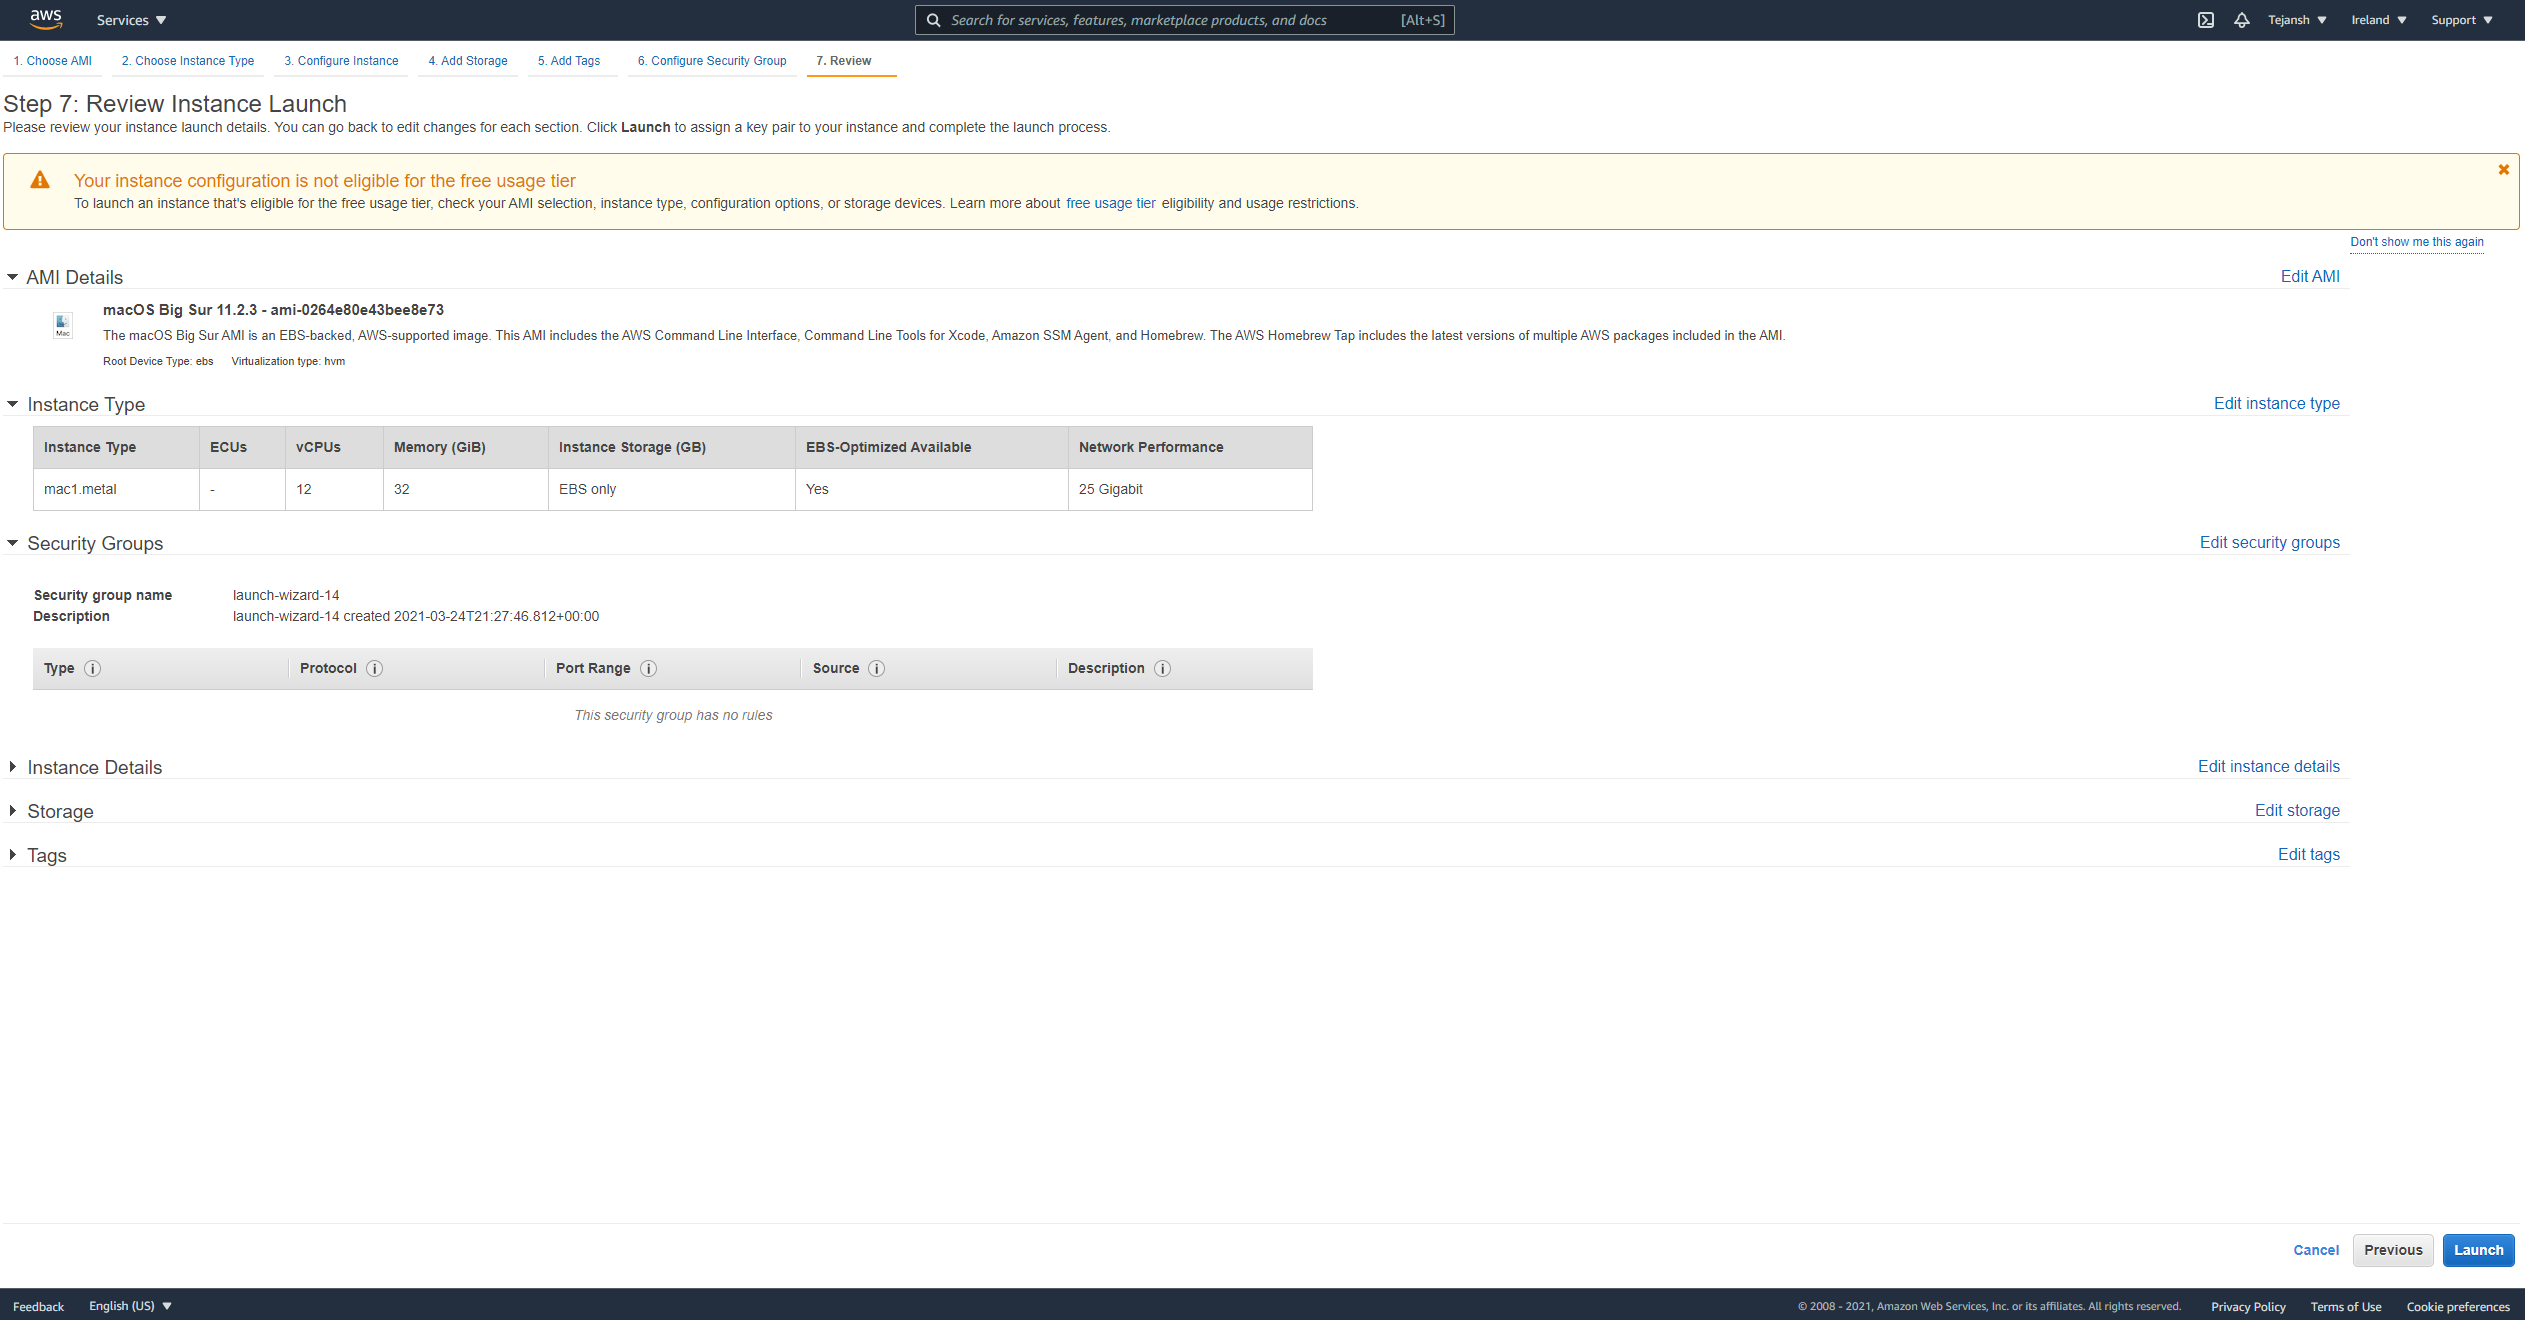
(Reminder - as you can see on this page, MacOS EC2 is not a free service and you will be charged for launching this machine.)
Next, click on Launch to launch the instance. Here, you will be asked to either select an existing key pair or create a new one. We will be using this key pair to login into our EC2 once it is launched. I am creating a new pair here and calling it mac-ec2-key. If you have a key already, you can use that or create a new one like me. If you are creating a new one, you first need to click on the Download Key Pair button and download the key pair before proceeding. Once downloaded, click on the Launch Instances button. You should now see the below page -
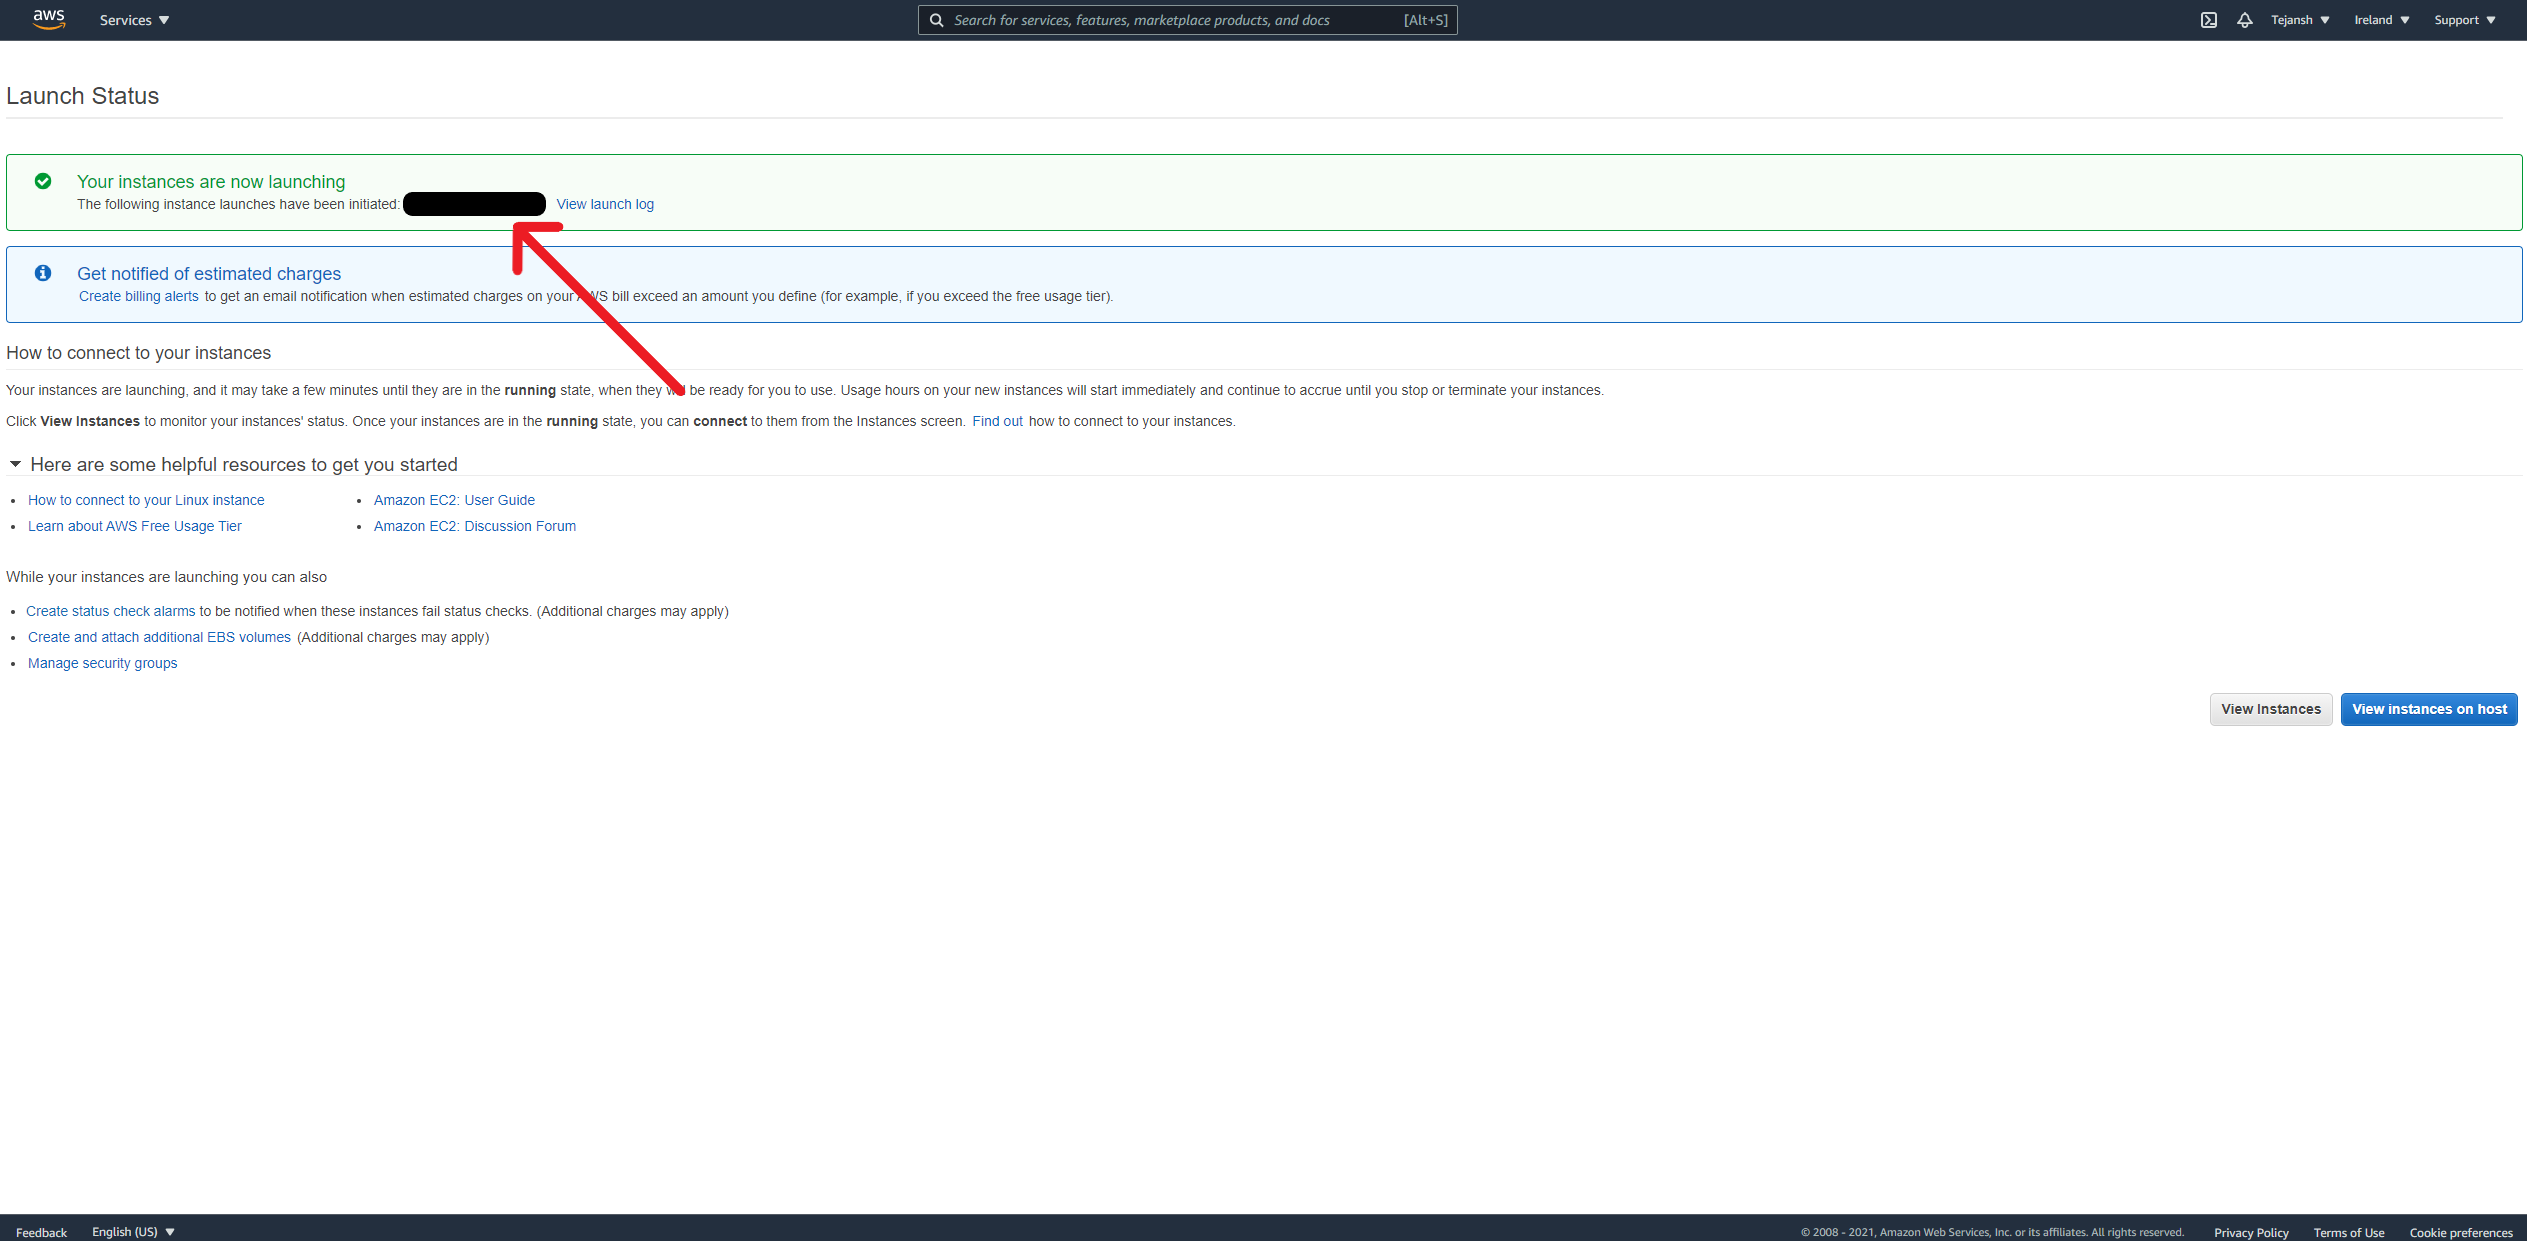
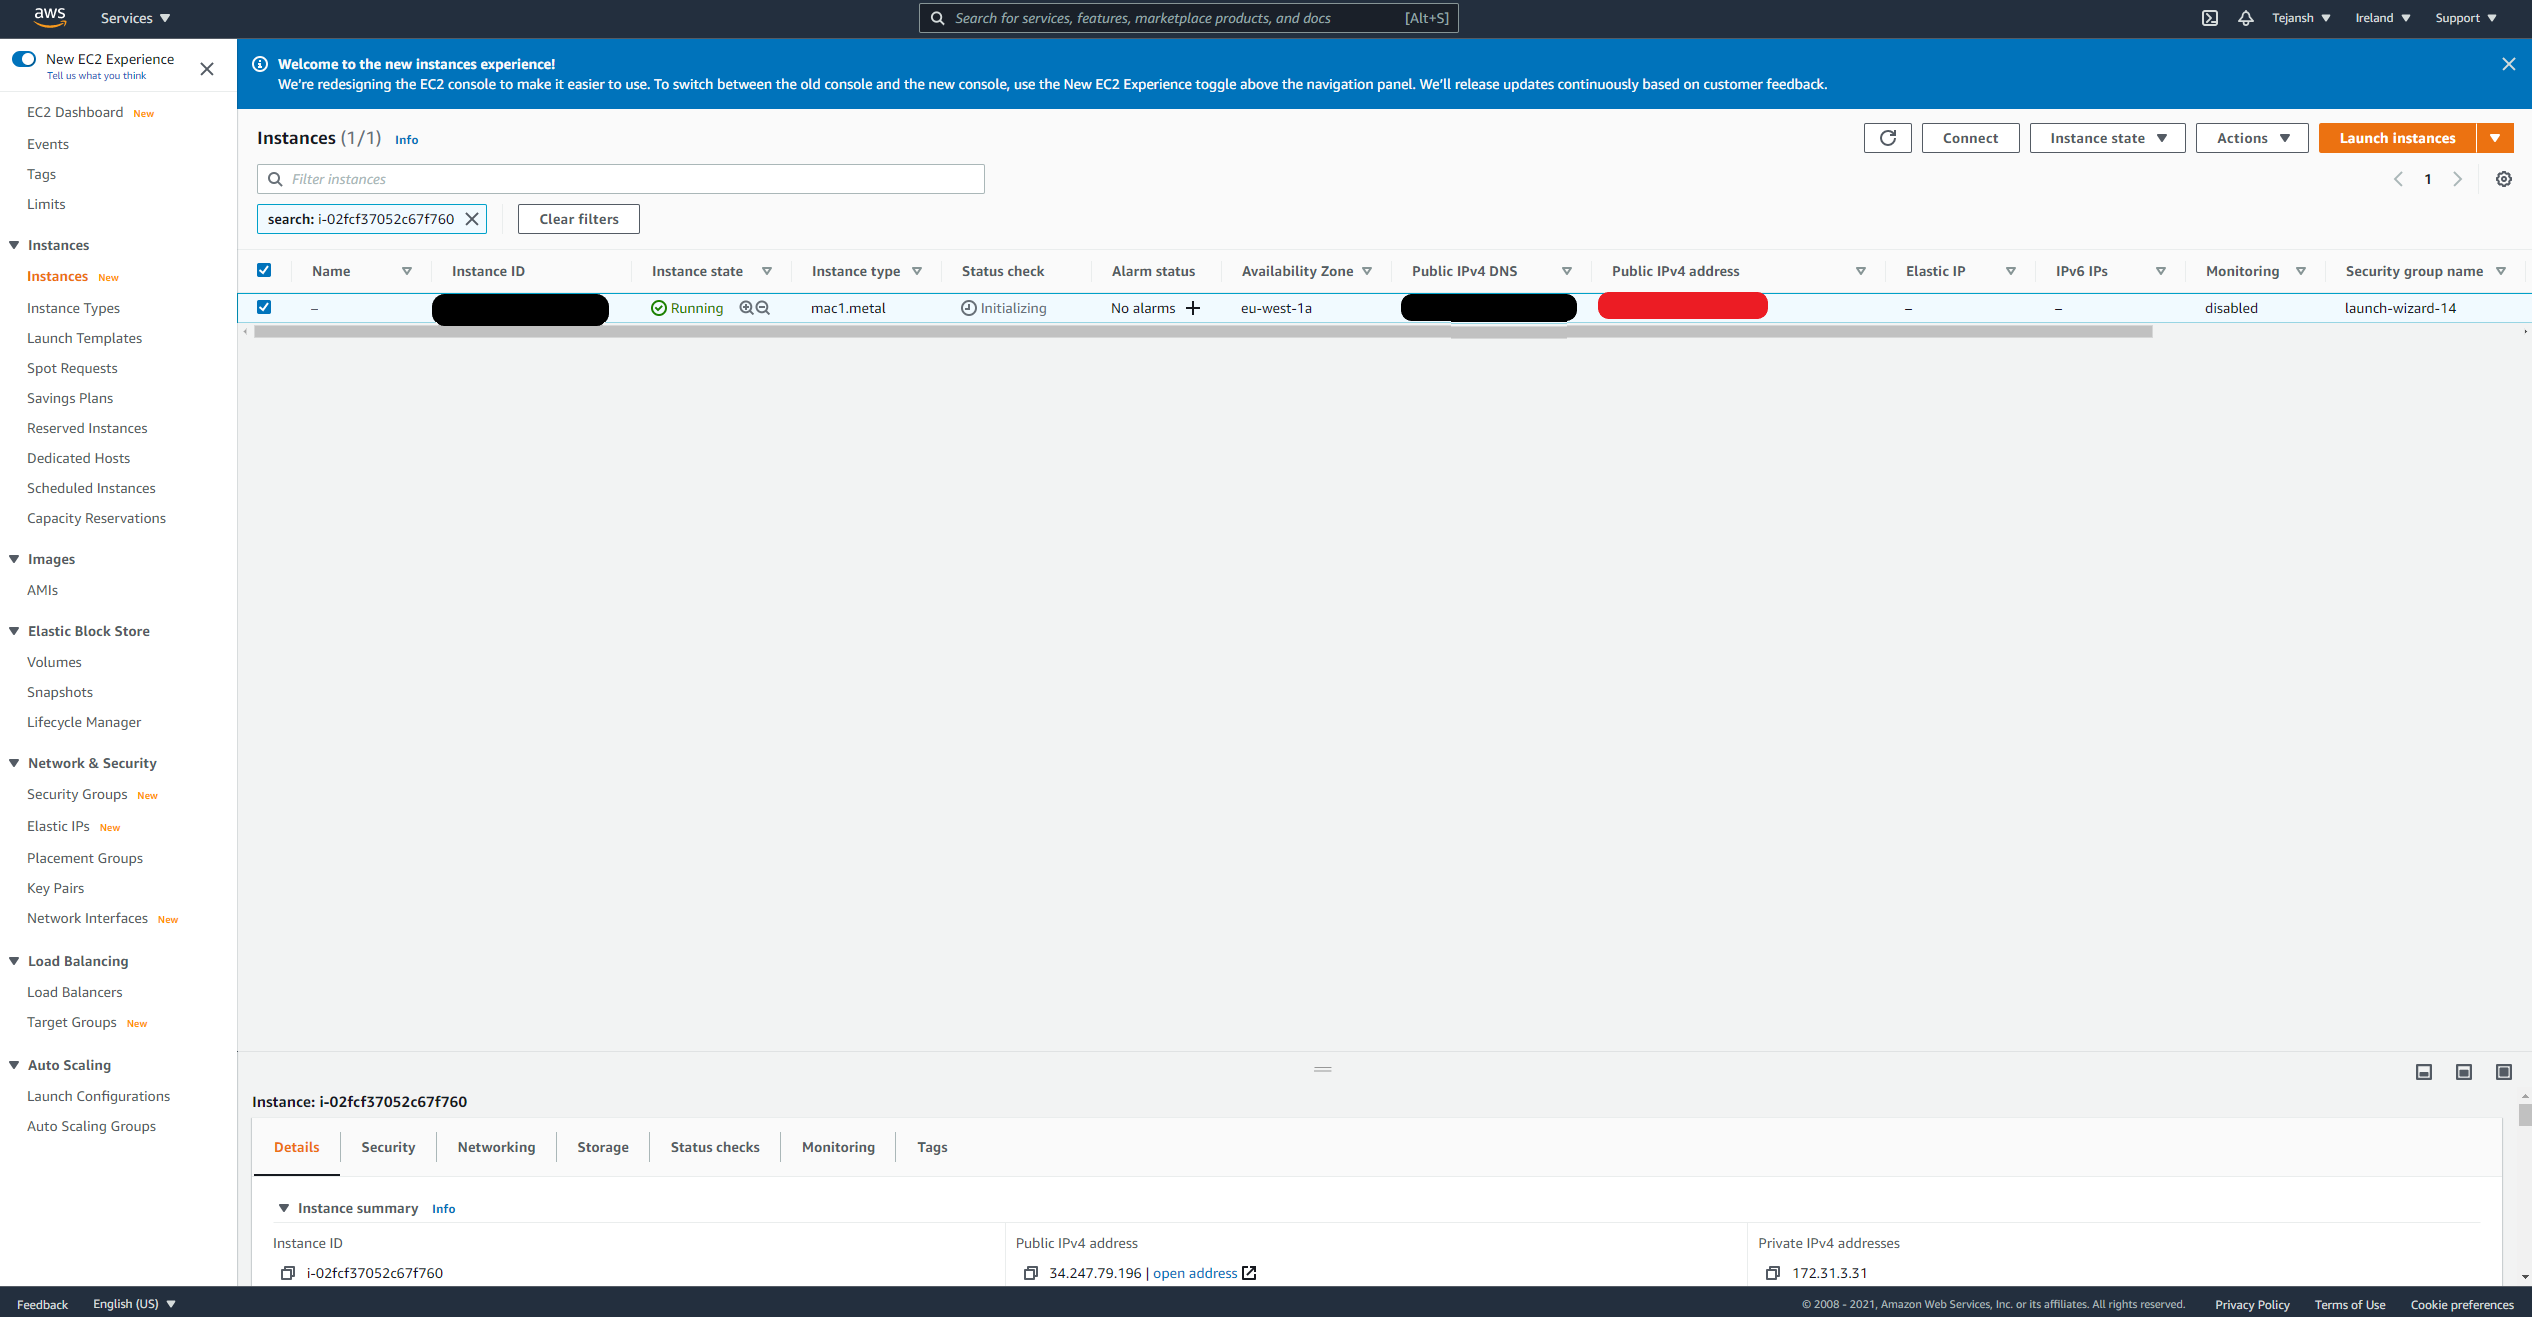
You will see an ID with a hyperlink (covered and pointed with an arrow in the above screenshot). Click on that hyperlink and you will be taken to the Instances page. On this page, you will see the details of the instance we just launched. It should look like the below image:
SSH to the EC2 machine
In the screenshot above (end of the previous section), notice the red box covering some information? That is your Public IPV4 DNS. We will be using this to connect to our EC2. But first, we need to convert the .pem file (key pair we had generated and saved in the step just before launching our EC2) to a .ppk file. To do so, open PuTTYgen (the application you must have downloaded as part of the setup covered earlier in the article) and click on the Load button. This will ask you to select a file. Here, select the .pem file. Note that by default the file type would be set to *.ppk. Click on that dropdown and select All Files (*.*). Now you should be able to see your .pem file. Select that file and click on Open. You should see a dialog box open now with a message indicating your key was successfully imported. Great, now click on Save private key and you should see a warning saying you are saving your private key with a passphrase. Click Yes. For the scope of this article, I am saving it without a passphrase to keep things simple. You can choose to save it with a passphrase.
Great, now we are ready to login into our Mac EC2. To do so, let's follow the below steps. Note that before proceeding, ensure that the Status check for your instance has passed:
- Copy the Public IPV4 DNS from your AWS console (shown in the screenshot above - covered in red)
- Open PuTTY.
- On the landing page of PuTTY, in the
Host Namesection, enterec2-user@your-IPV4-DNS(eg. if your IPV4 is 10.1.2.3, enterec2-user@10.1.2.3). Here,ec2-useris the default user name to access our EC2 instance. Take a look at the below screenshot for some clarity 👇
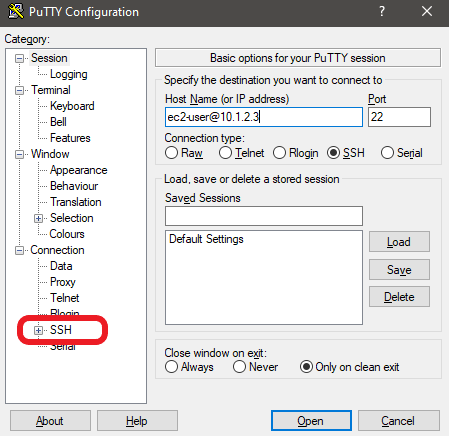
- Now, expand the
SSHsection (marked in red in the above screenshot) and selectAuth. There you would see an optionPrivate key file for authenticationand aBrowsebutton next to it. Here, browse and select the.ppkfile we have generated using PuTTYgen. - Now click on
Open.
Awesome, we are in! You would now be able to access your macOS via command line 🙌
Access the Mac EC2 GUI
We have successfully SSH'd into the machine but that's not all that we wanted to achieve. We also want to see the macOS interface. Let's see how we can do that.
First, we need to set up a password for our
ec2-userso that we can use this username/password from the GUI. Note that up until this point, we were only using the key pair for authentication. To set up a password, enter the following command into the session open in PuTTY -sudo passwd ec2-userYou will now be asked to enter and confirm the password.Now, we need to enable
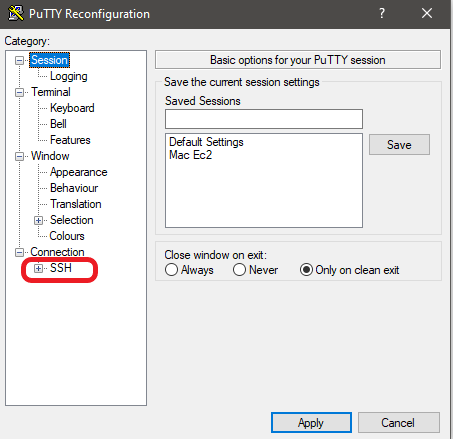
Apple Remote Desktopagent. To do this, pass the below command:sudo /System/Library/CoreServices/RemoteManagement/ARDAgent.app/Contents/Resources/kickstart -activate -configure -access -on -restart -agent -privs -allThis will enable remote desktop access for us to access the GUI. You can read more about thekickstartutility that we used here on this page.Now we need to tunnel port 5900 of the Mac EC2 to our localhost so that we can access the GUI from our local machine. We will do this from PuTTY again. To do this, from your active PuTTY session, right-click on the title bar and click on
Change Settings. This should open a window like below:
Great, now click on + button next to SSH as shown in the screenshot above. This should open up some additional choices. Here, click on Tunnels. Now, under Source port, add 5900, and under Destination add localhost:5900 and click on Add. Your configuration should look like below:
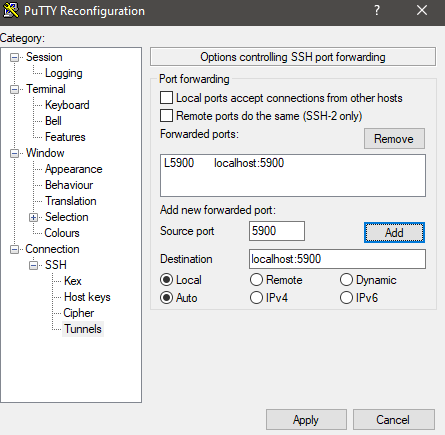
Alright, now click on Apply.
- Now, open VNC Viewer, and in the address bar, enter
localhost:5900and press enter. This will open a window to enter your username and password. Here, enter your username asec2-userand the password you have set in step 1 of this section. This should take you to the Mac EC2 GUI.
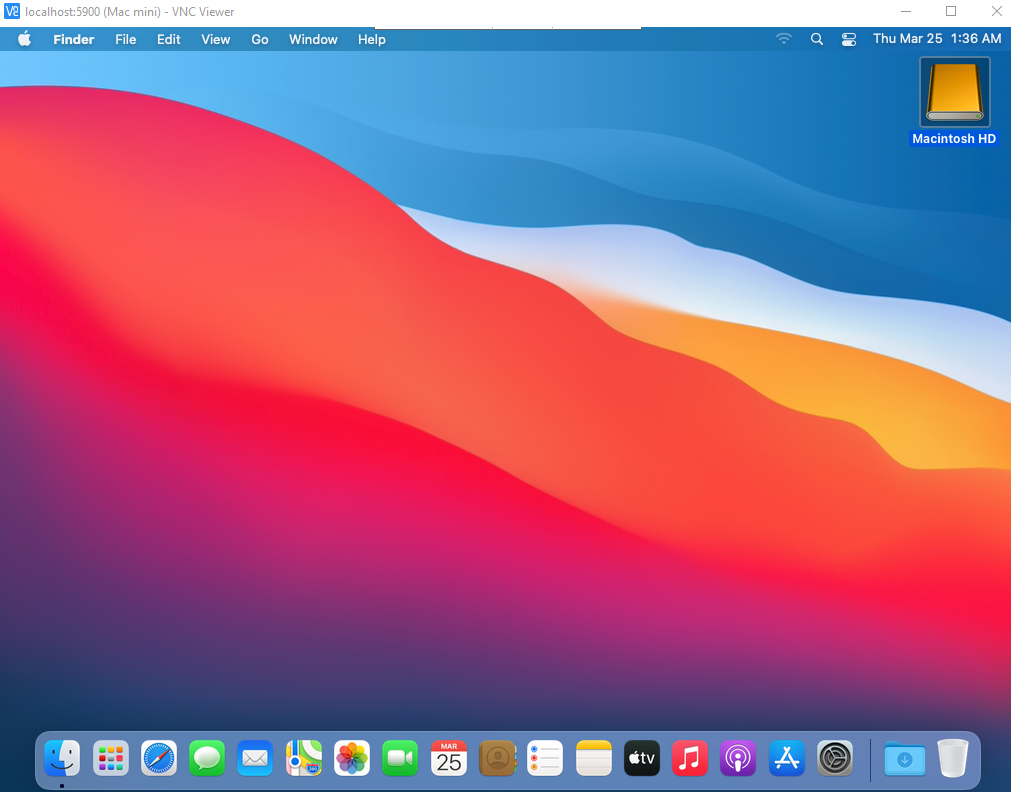
There it is! You can now use this machine to build your iOS apps or watch Apple TV or whatever you wish to do 🙂
Once you are done using this machine, remember to go back to the EC2 instances page, select the instance, click on Instance state button and select Terminate instance. This will terminate this Mac EC2 and avoid unnecessary billing. 24 hours later, you can also go to the Dedicated Hosts page and release the hosts.
Bonus
If you are wondering who is the target audience for these Mac EC2 machines, you are thinking along the right lines. While it is extremely helpful for developers working on hybrid apps who need a Mac machine to build and deploy their iOS apps without having to spend a mad amount of money on the hardware, they are not the only target audience. This service is extremely useful for organizations that work on iOS apps and want to build a build and deployment pipeline to automate the publishing of their iOS apps. It was possible to create such pipelines before this service was introduced as well. But that meant organizations creating their macOS servers - patching, licensing, updates, etc. Not to mention, it was a huge investment for these organizations to set up these macOS servers as well. AWS eliminated that overhead by introducing this range of Mac EC2 machines. 😎
If you try this process and come across any issues, please feel free to leave a comment with the issues you faced and I can help you debug that. You can also reach out to me on Twitter and I will be happy to help. ✌


